读《深入理解 kotlin 协程》- 01 同步异步
如果可以,购买《深入理解 kotlin 协程》支持作者 bennyhuo 霍丙乾!!!
异步和同步
异步和同步主要说的是代码执行的逻辑顺序
异步的概念
1
2
3
4
5
6
7
8
9
10
11
12
13
14
15
16
fun main () print("A" ) print("B" ) print("C" ) print("D" ) print("A" ) thread { print("C" ) print("D" ) } print("B" ) }
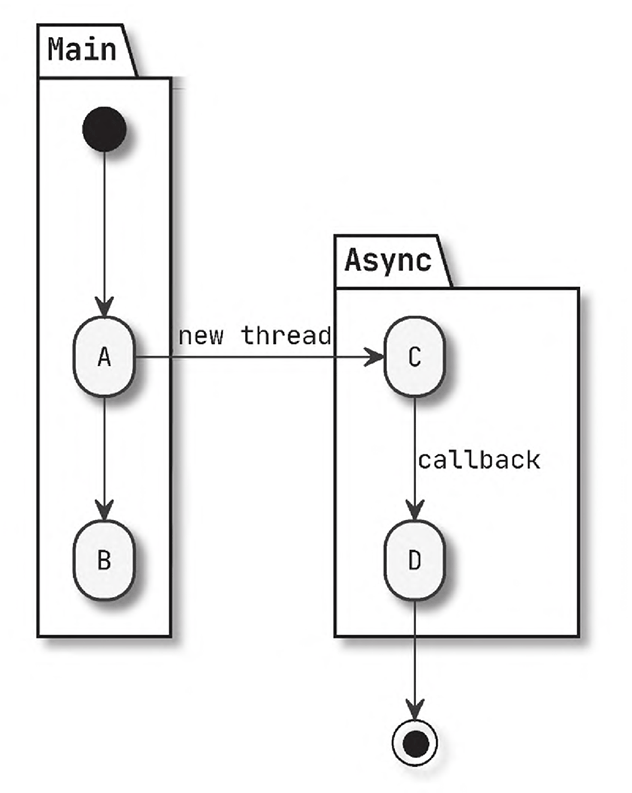
对于同步代码,输出的肯定是ABCD
而对于异步代码,最早输出的是A,但是B会在CD之前、之间还是之后,可就不一定了
如图:
异步设计的关键问题
结果传递
1
2
3
4
5
6
7
8
9
10
11
12
13
14
15
16
fun asyncBitmap ( url: String , callback: (Bitmap ) -> Unit ) return when (val bitmap = Cache.get (url)) { null -> { thread { download(url) .also { Cache.put(url, it) } .also(callback) } null } else -> bitmap } }
当Cache有bitmap的时候,就直接返回,否则就起一个线程来下载,并返回null
1
2
3
4
5
6
7
8
9
10
11
12
13
14
15
16
17
18
19
20
21
22
fun main () callAsync { println("End 0" ) callAsync { println("End 1" ) } } } fun callAsync (callback: (Bitmap ) -> Unit ) val bitmap = asyncBitmap( "https://www.bennyhuo.com/assets/avatar.jpg" ) { bitmap -> println("Async: $bitmap " ) callback(bitmap) } println("Main $bitmap " ) if (bitmap != null ) { callback(bitmap) } }
这里异步调用略微有点多,我们一点点看
首先我们先不看第二个callAsync,只假设main函数里callAsync只调用了println("End 0"),并没有调用第二个callAsync,这样会容易一些
我们先看callAsync的定义,里面只有 3 个操作
调用asyncBitmap去获取bitmap
打印Main $bitmap
在bitmap非空的时候,调用callback这个 callback 就是println("End 0")
然后再看asyncBitmap,发现Cache里没有bitmap,就会起一个线程下载图片并返回null
在下载成功的时候调用callback,这个callback就是比println("End 0")多打印了一个println("Async: $bitmap")
1 2 println("Async: $bitmap " ) println("End 0" )
所以应该很清楚了
它去缓存里看是否有bitmap,如果有就返回,然后在同步代码调用println("End 0")
如果缓存没有bitmap,就下载,在异步代码里调用println("End 0")
所以这个println("End 0")是在获取到bitmap之后,再调用的
然后我们再回过头来看我们忽略的第二个callAsync,是不是就是在上一段callAsync之后,再进行一次callAsync啊!
而这次我们Cache里面就有bitmap了,就不用再下载了,所以直接返回就行了
根据我们的猜测他的输出结果应该是什么呢?
1
2
3
4
5
Main null Async: [B@4bd36c21 End 0 Main [B@4bd36c21 End 1
前三行就是第一个callAsync
后两行就是第二个callAsync
当然,通常我们不会如此设计回调API,因为这样反而让程序写起 来更复杂了。更为常见的做法是,在结果就绪的情况下仍然立即以回 调的形式传递给调用方,以保证结果传递方式的透明性。
Kotlin协程的挂起函数(suspend function)本质上就采取 了这个异步返回值的设计思路
异常处理
我们改写一下asyncBitmap,去掉返回值,加上异常处理
1
2
3
4
5
6
7
8
9
10
11
12
13
14
15
16
17
18
19
20
21
22
fun asyncBitmap ( url: String, onSuccess: (Bitmap) -> Unit, onError: (Throwable) -> Unit ) thread { try { download (url).also (onSuccess) } catch (e: Exception) { onError (e) } } } fun callAsync2 () { try { val url = "https://www.bennyhuo.com/assets/avatar.jpg" checkUrl (url) asyncBitmap (url, onSuccess = ::show, onError = ::showError) } catch (e: Exception) { showError (e) } }
可以看到,我们不仅仅对download进行了异常捕获,而对于url也进行了异常捕获(毕竟一个不合法的url你怎么都没法处理,只能抛异常了)
通常情况下,我们需要在同步代码和异步代码都进行异常捕获,为什么呢?
你们看callAsync2,如果只在这个函数里进行异常捕获,那么还能捕获到download的异常吗?
很显然不能,因为它起了另一个线程,已经不是同一个栈了
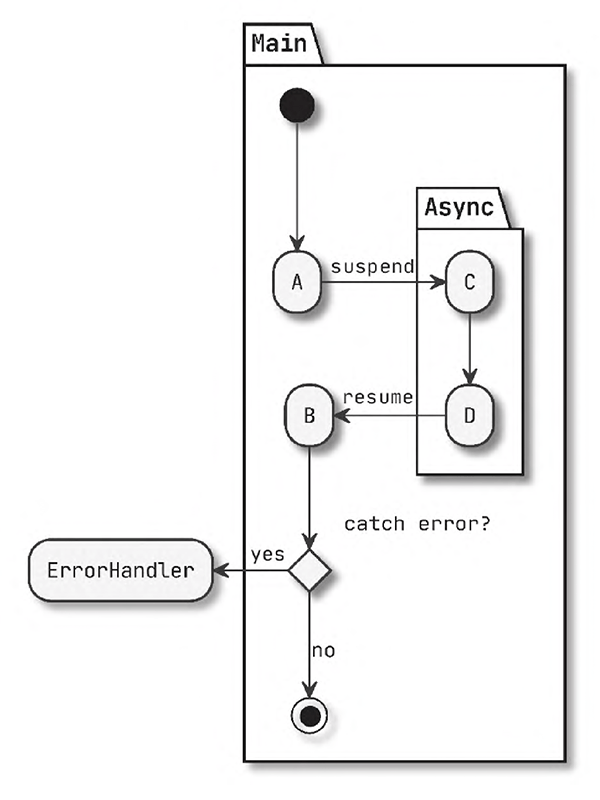
而协程他就是想解决将异步逻辑同步化,让异步的异常处理可以向同步处理一样
就像这样:
取消响应
稍微了解过Java多线程的肯定都知道,取消或者中断一个线程并不是一件容易的事
现在往往是调用interrupt()函数,然后等待线程判断到interrupted(),再自我执行中断逻辑
也就是需要被中断的线程配合才能中断,但线程如果不配合,你也没办法,这时的异步任务颇有断线风筝的意思,能否回来只能看风筝自己的“心情”了。
1
2
3
4
5
6
7
8
9
10
11
12
13
14
15
16
17
18
19
20
21
22
23
24
25
26
fun asyncBitmapCancellable ( url: String , onSuccess: (Bitmap ) -> Unit , onError: (Throwable ) -> Unit ) try { downloadCancellable(url).also(onSuccess) } catch (e: Exception) { onError(e) } } fun downloadCancellable (url: String ) return getAsStream(url).use { inputStream -> val bos = ByteArrayOutputStream() val buffer = ByteArray(1024 ) while (true ) { val length = inputStream.read(buffer, 0 , 1024 ) ...... if (Thread.interrupted()) throw InterruptedException("Task is cancelled." ) } bos.toByteArray() } }
JDK最初提供了停止线程的API,但它很快就被废弃 了,因为强行停止一个线程会导致该线程中持有的资源无法正常释 放,进而出现不安全的程序状态。
添加分支
我们可以为同步的逻辑添加分支甚至循环操作,这非常容易,但对于异步的逻辑而言,想要做到这一点就相对困难了。
当然这里同步逻辑的分支肯定也是同步的,异步逻辑的分支肯定也是异步的
1
2
3
4
5
6
7
8
9
10
11
12
13
14
15
16
17
18
19
20
21
22
23
24
25
26
27
28
29
30
31
32
33
34
val urls = arrayOf( "https://www.bennyhuo.com/assets/avatar.jpg" , "https://www.bennyhuo.com/assets/avatar.jpg" , "https://www.bennyhuo.com/assets/avatar.jpg" ) fun loopOnAsyncCalls () val countDownLatch = CountDownLatch(urls.size) val map = urls.associateWithTo(ConcurrentHashMap<String, Bitmap>()) { EMPTY_BITMAP } urls.map { url -> asyncBitmap(url, onSuccess = { map[url] = it countDownLatch.countDown() }, onError = { showError(it) countDownLatch.countDown() }) } countDownLatch.await() val bitmaps = map.values } fun asyncBitmap ( url: String , onSuccess: (Bitmap ) -> Unit , onError: (Throwable ) -> Unit ) thread { try { download(url).also(onSuccess) } catch (e: Exception) { onError(e) } } }
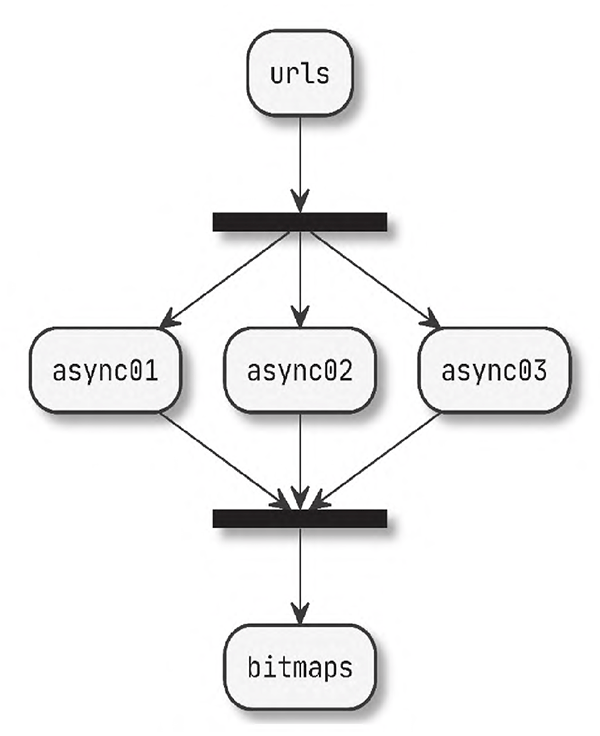
countDownLatch是一个计数器,我们这里让系统下载3个图片,就初始化为3
每下载完成或者下载失败就调用countDownLatch.countDown()让数值减1
然后调用countDownLatch.await()在这里阻塞,等待数值降到0
我们再写一个同步流程,同样下载三个图片
1
2
3
4
5
6
7
8
9
val urls = arrayOf( "https://www.bennyhuo.com/assets/avatar.jpg" , "https://www.bennyhuo.com/assets/avatar.jpg" , "https://www.bennyhuo.com/assets/avatar.jpg" ) fun loopOnSyncCalls () val bitmaps = urls.map { download(url) } }
然后再测量这两次的耗时
1
2
3
4
5
6
7
8
9
10
fun main () download("https://www.bennyhuo.com/assets/avatar.jpg" ) measureTimeMillis { loopOnAsyncCalls() }.let(::println) measureTimeMillis { loopOnSyncCalls() }.let(::println) }
download是为了先握手,这样后续就可以直接下载,无需握手,让对比更公平
可以看到,确实有一些差距,异步分支确实可以节省一些时间,更充分地利用性能
想想,如果你需要在异步逻辑里写循环,你还希望回收这些个线程,还有可能中断线程,这可就复杂了,因为在循环里,异步逻辑有多少个,还不清楚。
常见异步程序的设计思路
Java Future
1 2 3 4 5 6 7 8 9 10 11 12 13 14 15 16 17 18 19 20 21 22 val urls = arrayOf( "https://www.bennyhuo.com/assets/avatar.jpg" , "https://www.bennyhuo.com/assets/avatar.jpg" , "https://www.bennyhuo.com/assets/avatar.jpg" ) fun bitmapFuture (url: String ) return ioExecutor.submit(Callable { download(url) }) } val ioExecutor = Executors.newFixedThreadPool(Runtime.getRuntime().availableProcessors()) fun main () val bitmaps = urls.map { bitmapFuture(it) }.map { it.get () } }
在这里,我们创建了一个线程池,通过submit获取一个Future
kotlin map函数,翻译过来是映射函数,没错这个map是个动词,就是映射
1 2 3 4 5 6 7 8 9 public inline fun <T, R> Array<out T> .map (transform: (T ) -> R ) return mapTo(ArrayList<R>(size), transform) } public inline fun <T, R, C : MutableCollection<in R> > Array<out T> .mapTo (destination: C , transform: (T ) -> R ) for (item in this ) destination.add(transform(item)) return destination }
两个都是inline,我直接第二个合并到第一个
1 2 3 4 5 6 public inline fun <T, R> Array<out T> .map (transform: (T ) -> R ) val arrayList = ArrayList<R>(size) for (item in this ) arrayList.add(transform(item)) return arrayList }
可以看到,返回值是List<R>,仅仅只调用transform(item)并添加到这个List里面
第一个map返回一个List<Future>
第二个map返回一个List<Bitmap>
第一个map肯定很快就返回了,但是第二个map相当于在for循环里调用get函数,而get是一个阻塞函数。所以第二个map代码逻辑大概就是这样:
1 2 for (item in this ) arrayList.add(future.get ())
所以,单纯使用get并不好用
我们往往会搭配isDone来使用
比如:
1 2 3 4 5 6 7 8 9 10 11 12 13 14 fun main () val bitmapLists = urls.map { bitmapFuture(it) } val bitmaps = bitmapLists.map { while (true ){ if (it.isDone()){ it.get () break } } } }
你看,Future的get的阻塞性质,导致我们写出的代码都不太像异步了
Java CompletableFuture
JDK 1.8又新增了一个CompletableFuture类,它实现了Future接口, 通过它我们可以拿到异步任务的结果,此外,它还有很多更好用的方 法。
1 2 3 4 5 6 7 8 9 10 11 12 13 14 15 16 17 fun bitmapCompletableFuture (url: String ) CompletableFuture.supplyAsync { download(url) } fun callCompletableFuture () urls.map { bitmapCompletableFuture(it) }.let { futureList -> CompletableFuture.allOf(*futureList.toTypedArray()) .thenApply { futureList.map { it.get () } } }.thenAccept { bitmaps -> println(bitmaps.size) }.join() }
这里allof是用于等待所有CompletableFuture。
thenApply用于在所有CompletableFuture完成后,将结果映射为一个包含所有Bitmap的列表
thenAccept用于在所有图片都下载完成后执行指定的操作,这里只是输出图片的数量。
虽然CompletableFuture解决了异步结果不阻塞主调用流程的问题,但却让结果的获取脱离了主调用流程。
就类似retrofit默认回调那样
JavaScript Promise 与 async/await
CompletableFuture还实现了另一个接口——CompletionStage, 前面我们用到的thenAccept类似的方法也都是这个接口的API。从定义 和功能来看,CompletionStage是一个Promise。
那么Promise又是什么呢?按照 Promises/A+ ,Promise是一个异步任务,它存在挂起、完成、拒绝三个状态,当它处在完成状态时,结果 通过调用then方法的参数进行回调;出现异常拒绝时,通过catch方法 传入的参数来捕获拒绝的原因。
从ECMAScript 6开始,JavaScript就已经支持Promise了,我们先 来看之前的例子怎么用Promise来实现
1 2 3 4 5 6 7 8 9 10 11 12 13 14 15 16 17 18 19 20 21 22 23 24 25 26 27 28 29 30 31 32 33 34 const urls = [ "https://www.bennyhuo.com/assets/avatar.jpg" , "https://www.bennyhuo.com/assets/avatar.jpg" , "https://www.bennyhuo.com/assets/avatar.jpg" ]; function main ( Promise .all (urls.map (url =>bitmapPromise (url))) .then (bitmaps =>console .log (bitmaps.length )) .catch (e =>console .error (e)); } function bitmapPromise (url ) { return new Promise ((resolve, reject ) => { try { download (url, resolve) } catch (e) { reject (e) } }) } function download (url, callback ) { https.get (url, (res ) => { let data = '' ; res.on ('data' , chunk => data += chunk; }); res.on ('end' , () => { callback (data) }); } ); }
第8行,Promise.all会将多个Promise整合到一起,这与我们前面为整合CompletableFuture而定义的List<CompletableFuture<T>>.allOf如出 一辙。
最终我们得到一个新的Promise,它的结果是整合了前面所有bitmapPromise函数返回的结果的bitmaps,因此我们在then当中传入 的Lambda表达式就是用来处理消费这个bitmaps的。
这样看起来很不错,达到了与CompletableFuture同样的效果,不 过还可以更简洁。
我们可以通过async/await将上面的代码进一步简化
1 2 3 4 5 6 7 8 async function asyncMain ( try { const bitmaps = await Promise .all (urls.map (url =>bitmapPromise (url))); console .log (bitmaps); } catch (e) { console .error (e); } }
给整个逻辑的外部函数加上了async关键字,这样就可以在异 步调用返回Promise的位置加上await,这个语法糖可以把前面的then和catch调用转换成我们熟悉的同步调用语法。
这样就非常像样了,我们通过同步代码执行了异步流程
响应式编程
写过rxJava、liveData、 观察者模式之类的代码坑你定对响应式编程比较熟悉
1 2 3 4 5 6 7 8 9 10 11 12 fun main () Single.just("https://www.bennyhuo.com/assets/avatar.jpg" ) .map { download(it) } .subscribeOn(Schedulers.io()) .subscribe({ bitmap -> show(bitmap) }, { throwable -> showError(throwable) }) Thread.sleep(10000 ) }
Single是RxJava提供的一个像Promise的API
不过,Observable跟前面提到的Future和Promise有一个很大的不 同,它的逻辑执行取决于订阅,而不是立即执行。
此外,它还提供了 任意变换之间可以切换线程调度器的能力,这一能力让复杂的数据变 换和流转可以轻易实现异步。
当然,这也曾一度让它被滥用为线程切换的工具。
kotlin 协程
1 2 3 4 5 6 7 8 9 10 11 12 13 14 15 16 17 18 19 20 21 suspend fun bitmapSuspendable (url: String ) suspendCoroutine { continuation -> thread { try { continuation.resume(download(url)) } catch (e: Exception) { continuation.resumeWithException(e) } } } suspend fun main () try { val bitmap = bitmapSuspendable("https://www.bennyhuo.com/assets/avatar.jpg" ) show(bitmap) } catch (e: Exception) { println("下载失败" ) e.printStackTrace() } println("hello world!" ) }
我们使用标准库APIsuspendCoroutine<T>函数的返回值类型作为 挂起函数bitmap-Suspendable的返回值类型,也就是泛型参数T的实参Bitmap。
这个函数除了确定返回值类型外,还能够帮我们拿到一个Continuation的实例,负责保存和恢复挂起状态,逻辑效果上类似于Promise,其中几个函数意义如下。
-resume: 类似于Promise的resolve,将正常的结果返回,它的参数实际上就是bitmapSuspendable的返回值Bitmap。
-resumeWithException: 类似于Promise的reject,将异常返回,它的参数实际上就是bitmapSuspendable调用时会抛出的异常。
看我们调用的时候,直接try-catch
现在我们关掉网络,跑一遍
1 2 3 4 5 6 7 8 9 10 11 12 13 14 15 16 17 18 19 20 21 22 23 24 25 26 27 28 29 30 31 32 33 34 35 36 37 38 39 下载失败 hello world! java.net.UnknownHostException: www.bennyhuo.com: nodename nor servname provided, or not known at java.base/java.net.Inet6AddressImpl.lookupAllHostAddr(Native Method) at java.base/java.net.InetAddress$PlatformNameService.lookupAllHostAddr(InetAddress.java:930) at java.base/java.net.InetAddress.getAddressesFromNameService(InetAddress.java:1543) at java.base/java.net.InetAddress$NameServiceAddresses.get(InetAddress.java:848) at java.base/java.net.InetAddress.getAllByName0(InetAddress.java:1533) at java.base/java.net.InetAddress.getAllByName(InetAddress.java:1386) at java.base/java.net.InetAddress.getAllByName(InetAddress.java:1307) at okhttp3.Dns.lambda$static$0(Dns.java:39) at okhttp3.internal.connection.RouteSelector.resetNextInetSocketAddress(RouteSelector.java:171) at okhttp3.internal.connection.RouteSelector.nextProxy(RouteSelector.java:135) at okhttp3.internal.connection.RouteSelector.next(RouteSelector.java:84) at okhttp3.internal.connection.ExchangeFinder.findConnection(ExchangeFinder.java:187) at okhttp3.internal.connection.ExchangeFinder.findHealthyConnection(ExchangeFinder.java:108) at okhttp3.internal.connection.ExchangeFinder.find(ExchangeFinder.java:88) at okhttp3.internal.connection.Transmitter.newExchange(Transmitter.java:169) at okhttp3.internal.connection.ConnectInterceptor.intercept(ConnectInterceptor.java:41) at okhttp3.internal.http.RealInterceptorChain.proceed(RealInterceptorChain.java:142) at okhttp3.internal.http.RealInterceptorChain.proceed(RealInterceptorChain.java:117) at okhttp3.internal.cache.CacheInterceptor.intercept(CacheInterceptor.java:94) at okhttp3.internal.http.RealInterceptorChain.proceed(RealInterceptorChain.java:142) at okhttp3.internal.http.RealInterceptorChain.proceed(RealInterceptorChain.java:117) at okhttp3.internal.http.BridgeInterceptor.intercept(BridgeInterceptor.java:93) at okhttp3.internal.http.RealInterceptorChain.proceed(RealInterceptorChain.java:142) at okhttp3.internal.http.RetryAndFollowUpInterceptor.intercept(RetryAndFollowUpInterceptor.java:88) at okhttp3.internal.http.RealInterceptorChain.proceed(RealInterceptorChain.java:142) at okhttp3.internal.http.RealInterceptorChain.proceed(RealInterceptorChain.java:117) at common.api.ApiKt$httpClient$2.invoke$lambda$1(Api.kt:12) at okhttp3.internal.http.RealInterceptorChain.proceed(RealInterceptorChain.java:142) at okhttp3.internal.http.RealInterceptorChain.proceed(RealInterceptorChain.java:117) at okhttp3.RealCall.getResponseWithInterceptorChain(RealCall.java:229) at okhttp3.RealCall.execute(RealCall.java:81) at ch01.Listing05_06Kt.getAsStream(Listing05_06.kt:61) at ch01.Listing05_06Kt.download(Listing05_06.kt:51) at ch01.Listing23_24Kt$bitmapSuspendable$2$1.invoke(Listing23_24.kt:12) at ch01.Listing23_24Kt$bitmapSuspendable$2$1.invoke(Listing23_24.kt:10) at kotlin.concurrent.ThreadsKt$thread$thread$1.run(Thread.kt:30)
这里看到,信息都清楚地打印出来了
总结