
阅读 Retrofit 源码
Retrofit 简介
Retrofit 是 Square 公司开发的一款针对 Android 和 Java 的类型安全的网络请求框架。
官网说的是:A type-safe HTTP client for Android and Java
type-safe(类型安全):一个框架类型安全指的是它会在编译期间就将类型错误,不会在运行时报类型错误。
所以他会有大量的类型检查,在编译期间
OkHttp 和 Retrofit 的区别,Retrofit 是 OKHttp 的功能细分,Retrofit 实现网络请求更便携,相当于 Square 帮你把很多代码提前写好了,但 OKHttp 更灵活
源码开读
以下我使用的是 Retrofit 2.11.0 不同版本有些许差异,但我只以 2.11.0 为例
首先我们从 Retrofit.create() 开始读
1 | public <T> T create(final Class<T> service) { |
总体他一共就两行代码,第一行是 this.validateServiceInterface(service);,第二行是 return Proxy.newProxyInstance(...) 下面的都是他的参数
validateServiceInterface(验证)
首先我们看 this.validateServiceInterface(service);
1 | private void validateServiceInterface(Class<?> service) { |
-
一开始它进行了
service.isInterface()的判断,这个service就是我们在调用Retrofit.create()传入的参数,也就是我们自己声明的接口,比如:1
2
3
4interface GitHubService {
fun listRepos( user: String?): Call<List<Repo>>
}- 为什么要判断这个是不是接口呢?因为
Retrofit只允许你声明接口,这是它的设计意图,也是后面使用动态代理的条件
- 为什么要判断这个是不是接口呢?因为
-
后面它在确认你声明的是接口之后,生成了一个叫
check的Deque(双端队列),紧接着进行了一个while循环,判断条件是当check为空的时候结束循环。- 这个循环里它先将
check的第一个元素取出,判断它有没有泛型类型参数(详见我的泛型文章),因为泛型会类型擦除,导致动态代理的时候没办法生成具体的类型,会影响 HTTP 的响应和类型转换。
- 这个循环里它先将
-
Collections.addAll(check, candidate.getInterfaces());是在判断完当前接口之后,将它直接实现的接口放进check里面。依次判断,直到check为空。 -
下面是判断
validateEagerly(提前验证、提前确认) ,这是个控制开发者声明的接口什么时候初始化的一个开关- 默认
validateEagerly = false开发者声明的接口方法会在首次调用的时候调用loadServiceMethod方法,但如果将validateEagerly设为true,那就会在调用Retrofit.create()的时候进行loadServiceMethod - 由于
loadServiceMethod内部实现涉及到反射,所以集中将所有声明的接口方法初始化会可能会导致性能问题 - 但开启
validateEagerly可以在调用方法之前,进行检查,这样避免在调用方法的时候再发现问题,方便测试或者提前处理异常,对稳定有帮助
- 默认
OK!这样我们就看完了 validate 的流程,接下来该看 newProxyInstance(动态代理)了
newProxyInstance(动态代理)
动态代理可能对于部分人有些陌生
我觉的有必要从代理模式来讲解
静态代理
代理模式(Proxy Pattern)是一种结构型设计模式,它通过为目标对象(真实对象)提供一个代理对象,以控制对目标对象的访问。代理对象与真实对象实现相同的接口,调用代理对象的方法时,实际上可以在内部做一些额外的处理,然后再调用真实对象的方法。
所以,有一个实际的类,它的方法需要被隔离或者扩展,所以生成一个代理类,这个类的方法签名(函数名和参数列表)和实际的类一致,调用这个代理类的方法来影响实际类的方法。
也就是说,你想调用一个方法 RealImage.displsy() ,也就是想让 RealImage 显示在屏幕上。可是你又想让它在现实的时候,做一些其他的操作。
此时你就可以写一个代理类 ProxyImage 这个类和 RealImage 一样,都实现了同一个接口,或者干脆 ProxyImage 继承 RealImage,或者更干脆一点,两个类的函数签名(函数名和参数列表)一致就行。
注意
保持的继承关系可以让代码在结构上更稳定,索然让两个类的函数签名一致也可以达到代理的目的,但是有继承关系的代码更加稳定
1 | interface Image { |
输出结果:
1 | Loading wallpaper.png |
你会发现,在 Main 函数里,你使用了 ProxyImage 但却最终实际上调用了 RealImage 的 display() ,这就是代理模式中的静态代理
那么动态代理呢?
动态代理
和静态代理类似,动态代理是在运行的时候,生成 ProxyImage 来代理 ReadImage 处理一些代码逻辑。
1 | interface Image { |
同样,输出结果如下:
1 | Loading wallpaper.png |
动态代理也是一样,用一个代理类来代理实际的对象,可以看到在 Main 函数中也是用了 Proxy.newProxyInstance 第一个参数是需要一个能够加载需要被代理的接口的 ClassLoader,一般使用需要代理的接口的类加载器就可以。第二个参数是我们要代理的接口 Class 对象,第三个就是代理的核心逻辑 InvocationHandler
使用哪个 ClassLoader ?
- ClassLoader 一般只要使用
MyInterface.class.getClassLoader()就行了- 但由于一些其他的特殊情况,使用其他的
ClassLoader也是有可能的,比如:你不知道要代理的类是来自哪里,你可以使用Thread.currentThread().getContextClassLoader()- 为什么 java 就不能将
ClassLoader默认赋给你,而是要你显式传入呢?
- 这就涉及到 java
ClassLoader的设计哲学了,这里就不再岔开话题,想了解的移步隔壁 java ClassLoader 哲学
但这段代码确实对于刚接触的人来说有点陌生,到底是怎么代理呢?我们直接输出这个动态生成的类,一探究竟
我们切到 java8 使用 sun.misc.ProxyGenerator 来输出这个动态代理生成的类
1 | import sun.misc.ProxyGenerator; |
这是用来生成动态代理生成类的工具类
关于贴源码的提示
我一直认为贴出
import是很重要的,因为 java 里也很有很多重复的同名类名,贴出来import可以帮阅读者
1 | public final class ImageDynamicProxy extends Proxy implements Image { |
可以看到,这个动态生成的类,继承了 Proxy 类,实现了 Image 接口,并且重写了接口的所有方法
在最下面有一个 static 代码块,在类加载时自动执行一次,初始化了里面的所有方法(equals,display,toString,hashCode)的 Method 静态对象
在重写的每个接口的方法里,主要方法内容都是 super.h.invoke,也就是 InvocationHandler.invoke()
所以对于所有的方法都会调用 invoke,如果你要在遇到不同的方法时处理不同的逻辑,就在 invoke 的实现里可以使用 switch-case 对不同的方法进行不同的实现
这就是所有动态代理的内部原理
- 代理模式的主要意义:
- 控制访问
代理对象可以对客户端的请求进行拦截和控制。比如,可以在调用真实对象的方法之前进行权限校验、延迟加载、日志记 录或事务控制等操作,从而增加额外的安全性和灵活性。 - 解耦与增强扩展性
通过引入代理层,可以将一些横切关注点(例如日志记录、缓存、远程通信等)从核心业务逻辑中分离出来,降低系统耦 合度,增强代码的可维护性和扩展性。 - 统一接口
无论是直接访问真实对象,还是通过代理对象访问,都对客户端透明。客户端只需依赖接口,不必关心对象是代理还是具 体实现,简化了程序设计和后期维护。
- 控制访问
继续看 Retrofit
newProxyInstance
-
在
newProxyInstance中,声明了一个emptyArgs这个一看就是要在args为null的时候,传入的方法参数(来自第 11 行最后面) -
在
invoke方法里,使用getDeclaringClass判断这个方法的声明类是不是Object声明的方法,也就是toString()HashCode()这类函数,如果是的话就直接调用 -
而后是一个
Reflection对象,通过Platform.reflection来获得,这个其实很好理解我们看下里面的代码实现:1
2
3
4
5
6
7
8
9
10
11
12
13
14
15
16
17
18
19
20
21
22
23
24
25
26
27
28
29
30
31
32
33
34final class Platform {
static final Executor callbackExecutor;
static final Reflection reflection;
static final BuiltInFactories builtInFactories;
static {
switch (System.getProperty("java.vm.name")) {
case "Dalvik":
callbackExecutor = new AndroidMainExecutor();
if (SDK_INT >= 24) {
reflection = new Reflection.Android24();
builtInFactories = new BuiltInFactories.Java8();
} else {
reflection = new Reflection();
builtInFactories = new BuiltInFactories();
}
break;
case "RoboVM":
callbackExecutor = null;
reflection = new Reflection();
builtInFactories = new BuiltInFactories();
break;
default:
callbackExecutor = null;
reflection = new Reflection.Java8();
builtInFactories = new BuiltInFactories.Java8();
break;
}
}
private Platform() {}
}Platform顾名思义就是平台,里面的reflection是一个 Android api 等级的对象,通过判断java.vm.name来获得,也就是说这是个判断你使用的是哪个 Android 版本的对象 -
最后这个
return里面是一个判断,如果reflection.isDefaultMethod(method)为true,就返回reflection.invokeDefaultMethod(method, service, proxy, args)否则就返回loadServiceMethod(service, method).invoke(proxy, args);
我们先看reflection.isDefaultMethod(method)这里一共只有三种reflection分别是Android24Reflection和Java8,我们一个个看-
Android241
2
3
4
5
6
7static final class Android24 extends Reflection {
boolean isDefaultMethod(Method method) {
return method.isDefault();
}
......
}这个方法调用的是用于判断是不是接口声明时候的实现的
default方法 -
Reflection1
2
3
4
5
6class Reflection {
boolean isDefaultMethod(Method method) {
return false;
}
......
}这里直接返回了
false -
Java81
2
3
4
5
6
7
8// Only used on JVM.
static class Java8 extends Reflection {
boolean isDefaultMethod(Method method) {
return method.isDefault();
}
......
}这里也是直接判断是不是接口实现的
default方法method.isDefault()
从 Java 8 开始,接口(interface)中可以包含带有实现的方法,这种方法通过关键字 default 声明。例如:
1
2
3
4
5
6// Only used on Android API 24+.
public interface MyInterface {
default void sayHello() {
System.out.println("Hello from default method!");
}
}这个就是用来判断是不是接口声明的时候,写的
default方法所以你应该就明白了,就是判断是不是支持 java8 (原生 Android api 24 开始支持 java8 特性),支持就判断是不是接口的
default方法,不支持,那就不可能是接口的default方法,干脆直接返回false提示
- 如果你在看过其他的 Retrofit 源码,你可能会发现有一个
hasJava8Types的字段,其实效果是一样的,都是为了判断是否有接口的default实现
- 如果你在看过其他的 Retrofit 源码,你可能会发现有一个
-
-
我们继续看,当判断了接口里有默认实现,我们这里就直接调用
invokeDefaultMethod方法,这个方法又是什么呢?
我们还是看看实现,这次我们直接放结论,如果是 Reflection,就直接抛出AssertionError因为他没法声明default方法,如果是Java8或者Android24就直接使用DefaultMethodSupport.invoke调用default方法,也就是说,Retrofit会认为你自己实现好了方法调用逻辑而不会帮你生成内部实现。 -
最后,如果你没有接口的
default实现,那么就轮到Retrofit来帮你实现了,也就是最后的loadServiceMethod
loadServiceMethod
我们看到最后一行,loadServiceMethod(service, method).invoke(proxy, args); 这里调用了两个方法,第一个 loadServiceMethod 返回一个 ServiceMethod,然后调用 ServiceMethod 的 invoke 方法,我直接进去看看源码
1 | ServiceMethod<?> loadServiceMethod(Class<?> service, Method method) { |
- 我们发现这个
loadServiceMethod方法总体来说就是返回了一个ServiceMethod,我们先看它怎么实现的,再看invoke - 这个方法里是一整个
while循环 - 先是在
serviceMethodCache里取出一个Object- 如果这个
Object的类型是ServiceMethod,那就说明这个方法就已经被加载了,就会直接返回这个对象。 - 如果它是空的,那就说明方法还没被加载,就会
new一个Object lock- 然后紧接着我们对这个
lock加锁,调用putIfAbsent将这个method作为key放进去,value是lock,再次判断lookup为空(这里putIfAbsent放进去method之后,如果之前没有这个key就会返回null,然后使用if (lookup == null)所以这里不仅进行了双重锁检验还将method放进去了,value是lock) - 然后
result = ServiceMethod.parseAnnotations(this, service, method);生成一个名为result的ServiceMethod的对象,也就是初始化这个方法。 - 如果这里
catch到问题,会把刚才添加进去的method移除掉 - 如果初始化成功,就更新缓存,也就是将刚才初始化的
result放进serviceMethodCache里面
- 然后紧接着我们对这个
- 如果这个
寻找 invoke
-
看明白可这个方法我们先回过头看看
invoke1
abstract T invoke(Object instance, Object[] args);
发现他就是一个抽象方法,没有实现,那我们就得找找这个类的实现了,所以继续看
loadServiceMethod返回的对象,也就是最后的那个ServiceMethod.parseAnnotations
ServiceMethod.parseAnnotations
进入这个源码我们发现,他和 invoke 在一个类里实现,那我们看 ServiceMethod.parseAnnotations 它内部是怎么实现的
1 | static <T> ServiceMethod<T> parseAnnotations(Retrofit retrofit, Class<?> service, Method method) { |
这个方法很简单,我们一步步看
-
一开始生成了一个
RequestFactory这个就是来生成 HTTP 请求报文的
简单看一下这个类,里面使用了Builder,并且有一些分析注解的方法 -
getGenericReturnType是在方法的获取返回类型 -
然后判断这个
returnType是否是没法处理的类型,我们看看它内部实现1
2
3
4
5
6
7
8
9
10
11
12
13
14
15
16
17
18
19
20
21
22
23
24
25
26
27
28
29
30static boolean hasUnresolvableType( Type type) {
if (type instanceof Class<?>) {
return false;
}
if (type instanceof ParameterizedType) {
ParameterizedType parameterizedType = (ParameterizedType) type;
for (Type typeArgument : parameterizedType.getActualTypeArguments()) {
if (hasUnresolvableType(typeArgument)) {
return true;
}
}
return false;
}
if (type instanceof GenericArrayType) {
return hasUnresolvableType(((GenericArrayType) type).getGenericComponentType());
}
if (type instanceof TypeVariable) {
return true;
}
if (type instanceof WildcardType) {
return true;
}
String className = type == null ? "null" : type.getClass().getName();
throw new IllegalArgumentException(
"Expected a Class, ParameterizedType, or "
+ "GenericArrayType, but <"
+ type
+ "> is of type "
+ className);
}- 第一个判断,是判断这个类型是不是
Class类型,如果是就返回false,也就是没有无法处理的类型 - 第二个判断,是判断是否是
ParameterizedType也就是泛型类型,如果是就进入循环,进入泛型类型参数里递归检查类型是否是不可处理的,只要有一个不可处理,就返回true。 - 第三个判断,泛型数组,取出泛型类型,递归判断这个泛型类型是否不可处理,也就是回到了第二个判断
- 第四个判断,类型变量,也就是泛型类型参数类型,就返回
true。 - 第五个判断,通配符类型,也就是
?,? extends,? super,这种也不能判断,所以返回true - 最后如果以上判断都没有,就最后抛出异常,提示需要以上类型中的一个
- 第一个判断,是判断这个类型是不是
-
继续回看
parseAnnotations,判断返回类型是否为void类型,如果就是就抛出异常“不允许返回 void” -
最后返回
HttpServiceMethod.parseAnnotations,我们继续查看HttpServiceMethod发现他继承了ServiceMethod类似,也是一个抽象类。 -
所以最后还是又套了一层,调用了
HttpServiceMethod.parseAnnotations那我们继续看HttpServiceMethod吧
我们进入HttpServiceMethod.parseAnnotations这个方法之后太长了,我们先看有没有简单的,比如invoke
找到 invoke
HttpServiceMethod 确实有实现 invoke 方法
1 |
|
- 这个方法是创建饿了一个
Call而且还是一个OkHttpCall我们简单看一下,它实现了Call接口,如果你看过OkHttp的源码, 这里应该会感觉很熟悉,我们后面再分析,再继续看invoke - 然后调用了
adapt方法,那adapt方法又是怎么实现的,我们继续看
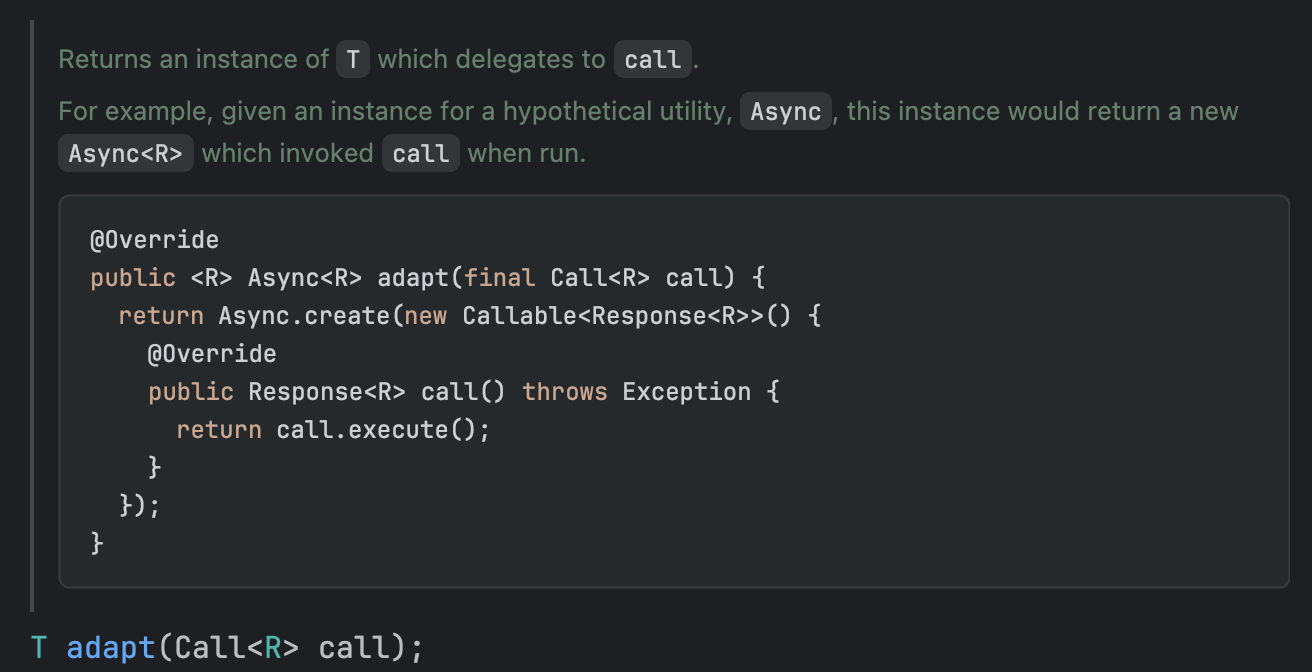
寻找 adapt
1 | protected abstract ReturnT adapt(Call<ResponseT> call, Object[] args); |
又是抽象方法,所以我们需要像找 invoke 一样找找这个 HttpServiceMethod 的具体实现了,回去继续看它的 HttpServiceMethod.parseAnnotations
HttpServiceMethod.parseAnnotations
1 | static <ResponseT, ReturnT> HttpServiceMethod<ResponseT, ReturnT> parseAnnotations( |
这个方法确实有点长,我们粗略看一下,我们直接找 return,也就是看看他到底是怎么返回一个 HttpServiceMethod 的
也就是最后一段:
1 | if (!isKotlinSuspendFunction) { |
也就是说,这里通过判断是否是 suspend 方法来生成对应的 HttpServiceMethod,既然是 suspend 方法,那肯定也得生成 suspend 方法啊,这是对于 kotlin 协程的适配
我们直接看对于普通方法的实现,这篇文章就先不管 suspend 方法,我们直接看 CallAdapted
找到 adapt
1 | static final class CallAdapted<ResponseT, ReturnT> extends HttpServiceMethod<ResponseT, ReturnT> { |
这个 CallAdapted 实现了 HttpServiceMethod 并且实现了 adapt
注意
CallAdapted的含义就是被适配的Call,很多英语层面的含义还是可以看出来一些代码的设计意图的
然后我们此时可以继续往源码内部深入,找到 retrofit.callAdapter,Retrofit 类里面有一个 callAdapterFactories 而这个 callAdapterFactories 会在 Retrofit 的构造函数里初始化,然后我们想到 Retrofit 我们平时不都是 build 出来的吗?!就像这样
1 | val retrofit = Retrofit.Builder() |
然后我们发现这文件里确实有 build 方法,这里一下子就串起来了。
我们继续深入挖掘,找找这个 callAdapterFactories 是这么初始化的,找到 DefaultCallAdapterFactory,并发现如下代码
1 | return new CallAdapter<Object, Call<?>>() { |
然后大致就知道这个就是返回一个 Call 的实例(在这里是 ExecutorCallbackCall),返回看代码注释里写的就是
闭环了
所以我们挖了这么久回头梳理一下,就是要搞明白 loadServiceMethod(service, method).invoke(proxy, args) 这行代码最终干了什么————就是返回了一个 ExecutorCallbackCall
loadServiceMethod会返回一个CallAdapted,这个CallAdapted继承了HttpServiceMethod- 返回他之后,会调用
invoke,这个invoke会调用adapt,最终调用AdapterFactory的get返回一个ExecutorCallbackCall - 总结就是动态代理的
InvocationHandler的invoke方法会返回一个ExecutorCallbackCall,也就是我们写的val service = retrofit.create(GitHubService::class.java)的service里面会调用invoke并返回一个ExecutorCallbackCall - 我们看看
ExecutorCallbackCall这个方法里面也有enqueue那么既然动态代理就是为了生成这个ExecutorCallbackCall是不是就意味着这个enqueue就是我们开发的时候写的那个enqueue————还真是!!!! - 我们看看这个
enqueue实现了什么吧
1 | public Call<Object> adapt(Call<Object> call) { |
- 这个
delegate就是我们一开始调用adapt填入的那个Call,也就是OkHttpCall,一会儿我们再看OkHttpCall我们先把这个看完 - 也就是说这个
ExecutorCallbackCall把这个OkHttpCall包了一层 - 这个
ExecutorCallbackCall的enqueue里面使用了一个Executor切了线程,并调用了callback的onFailure和onResponse(也就是开发时候写的callback) - 这里切线程是有点奇怪的,因为如果最终使用的是
OkHttp的enqueue,那就没有必要在这里切线程了,所以我们再深挖一下,看看这个callbackExecutor里面是怎么操作的 - 我们找到这个
callbackExecutor是在 Retrofit 的构造方法里初始化的callbackExecutor = Platform.callbackExecutor;点进去发现是这样的
1 | static { |
-
又是熟悉的代码,我们看看这个
AndroidMainExecutor的实现1
2
3
4
5
6
7
8
9
10final class AndroidMainExecutor implements Executor {
private final Handler handler = new Handler(Looper.getMainLooper());
AndroidMainExecutor() {
}
public void execute(Runnable r) {
this.handler.post(r);
}
}这里就看出来,原来没有切线程,而是在主线程里,这是再往前台切线程
所以这就是为什么 Retrofit 的callback里面的代码可以更新界面(Android 更新界面需要在主线程)
所以这个 adapt 的作用还有将线程切回主线程的作用
回看 OkHttpCall
然后我们继续返回 HttpServiceMethod 里面回看 invoke 里的 OkHttpCall
注意
这个
OkHttpCall和Call都是Retrofit里面的,并非OkHttp里面的
我们挑一个关键函数看,比如经常使用的 enqueue
1 | public void enqueue(final Callback<T> callback) { |
-
代码有点长,但其实并不复杂,做了一些判断,然后调用
createRawCall创建一个okhttp3.Call
哎!!(キ`゚Д゚´)!!最终还是调用了okhttp3.Call -
创建成功就是调用
call.enqueue也就是我们自己写OkHttp的时候使用的enqueue,写个Callback接收Response。 -
我们可以发现,有一个
response = OkHttpCall.this.parseResponse(rawResponse);也就是说 Retrofit 帮你处理了rawResponse并不是直接丢给你,具体怎么处理的一看就懂,这里贴一下代码1
2
3
4
5
6
7
8
9
10
11
12
13
14
15
16
17
18
19
20
21
22
23
24
25
26
27
28
29
30
31Response<T> parseResponse(okhttp3.Response rawResponse) throws IOException {
ResponseBody rawBody = rawResponse.body();
rawResponse = rawResponse.newBuilder().body(new NoContentResponseBody(rawBody.contentType(), rawBody.contentLength())).build();
int code = rawResponse.code();
if (code >= 200 && code < 300) {
if (code != 204 && code != 205) {
ExceptionCatchingResponseBody catchingBody = new ExceptionCatchingResponseBody(rawBody);
try {
T body = (T)this.responseConverter.convert(catchingBody);
return Response.success(body, rawResponse);
} catch (RuntimeException e) {
catchingBody.throwIfCaught();
throw e;
}
} else {
rawBody.close();
return Response.success((Object)null, rawResponse);
}
} else {
Response e;
try {
ResponseBody bufferedBody = Utils.buffer(rawBody);
e = Response.error(bufferedBody, rawResponse);
} finally {
rawBody.close();
}
return e;
}
} -
里面有一个比较关键的对象
responseConverter -
它刚才我们就见过,在
OkHttpCall被创建的时候,再往上追溯会在HttpServiceMethod.parseAnnotations里找到1
new CallAdapted<>(requestFactory, callFactory, responseConverter, callAdapter);
-
以及调用方法
1
Converter<ResponseBody, ResponseT> responseConverter = createResponseConverter(retrofit, method, responseType);
-
我们看
createResponseConverter1
2
3
4
5
6
7
8
9private static <ResponseT> Converter<ResponseBody, ResponseT> createResponseConverter(
Retrofit retrofit, Method method, Type responseType) {
Annotation[] annotations = method.getAnnotations();
try {
return retrofit.responseBodyConverter(responseType, annotations);
} catch (RuntimeException e) { // Wide exception range because factories are user code.
throw methodError(method, e, "Unable to create converter for %s", responseType);
}
}
也就是这个 responseBodyConverter 实际来自 retrofit.responseBodyConverter,也就是我们开发的时候写的那个 Converter
OK!完美了!基本就差不多了。
- 标题: 阅读 Retrofit 源码
- 作者: Lucas
- 创建于 : 2025-04-02 20:17:50
- 更新于 : 2025-12-22 14:33:30
- 链接: https://darkflamemasterdev.github.io/2025/04/02/阅读-Retrofit-源码/
- 版权声明: 本文章采用 CC BY-NC-SA 4.0 进行许可。