阅读 OKHttp 源码

阅读 OKHttp 源码

lucas Lv4

OkHttp 是 Square 公司的开发框架

早期,Android 提供的是两种 HttpApi 一个是 Android 的 HttpUrlConncection,另一个是 Apache 的 HttpClient

OkHttp 觉的这俩都不好用不好用,就基于这两个 Api 进行了二次开发和封装,但最后还是不好用,所以最后就干脆彻底开发了一个自己的 Http 框架————OkHttp。

后来 Google 在 Android4.4 开始,基于 OkHttp 的实现替换了原先 Android 中基于 Apache Harmony 的 HttpURLConnection 实现。正如安卓核心开发者 CommonsWare 所指出的:“从 Android 4.4 开始,Android 内部的 HttpURLConnection 实现使用了 OkHttp”

OkHttp 4 以 Kotlin 重写了原有 Java 代码

此次我们读的是 4.12.0 版本

我们先看 OkHttp 的最基本用法

1
2
3
4
5
6
7
8
9
10
11
12
13
14
15
val url = "https://api.github.com/users/octocat/repos"
val client: OkHttpClient = OkHttpClient()
val request: Request = Request.Builder()
.url(url)
.build()

client.newCall(request).enqueue(object : Callback {
override fun onFailure(call: Call, e: IOException) {

}

override fun onResponse(call: Call, response: Response) {
println(response.code)
}
})

我们从一个个看里面的代码

OkHttp 框架结构解析

OkHttpClient

首先我们看 OkHttpClient

1
2
3
4
5
6
7
8
9
10
11
12
13
14
15
16
17
18
19
20
21
22
23
24
25
26
27
28
29
30
31
32
33
34
35
36
37
38
39
40
41
42
43
44
45
46
47
48
49
50
51
52
53
54
55
56
57
58
59
60
61
62
63
64
65
66
67
68
69
70
71
72
73
74
75
76
77
78
79
80
81
82
83
84
85
86
87
88
89
90
91
92
93
94
95
96
97
98
99
100
101
102
103
104
105
106
107
108
109
110
111
112
113
114
115
116
117
118
119
120
121
122
123
124
125
126
127
128
129
130
131
132
133
134
135
136
137
138
139
140
141
142
143
144
145
146
147
148
149
150
151
152
153
154
155
156
157
158
159
160
161
162
163
164
165
166
167
168
169
170
171
@get:JvmName("dispatcher") val dispatcher: Dispatcher = builder.dispatcher

@get:JvmName("connectionPool") val connectionPool: ConnectionPool = builder.connectionPool

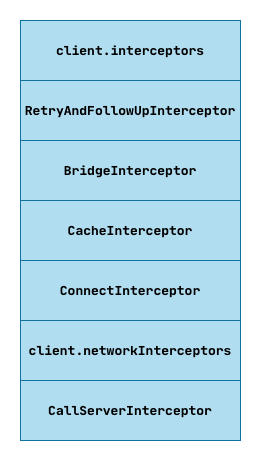
/**
* Returns an immutable list of interceptors that observe the full span of each call: from before
* the connection is established (if any) until after the response source is selected (either the
* origin server, cache, or both).
*/
@get:JvmName("interceptors") val interceptors: List<Interceptor> =
builder.interceptors.toImmutableList()

/**
* Returns an immutable list of interceptors that observe a single network request and response.
* These interceptors must call [Interceptor.Chain.proceed] exactly once: it is an error for
* a network interceptor to short-circuit or repeat a network request.
*/
@get:JvmName("networkInterceptors") val networkInterceptors: List<Interceptor> =
builder.networkInterceptors.toImmutableList()

@get:JvmName("eventListenerFactory") val eventListenerFactory: EventListener.Factory =
builder.eventListenerFactory

@get:JvmName("retryOnConnectionFailure") val retryOnConnectionFailure: Boolean =
builder.retryOnConnectionFailure

@get:JvmName("authenticator") val authenticator: Authenticator = builder.authenticator

@get:JvmName("followRedirects") val followRedirects: Boolean = builder.followRedirects

@get:JvmName("followSslRedirects") val followSslRedirects: Boolean = builder.followSslRedirects

@get:JvmName("cookieJar") val cookieJar: CookieJar = builder.cookieJar

@get:JvmName("cache") val cache: Cache? = builder.cache

@get:JvmName("dns") val dns: Dns = builder.dns

@get:JvmName("proxy") val proxy: Proxy? = builder.proxy

@get:JvmName("proxySelector") val proxySelector: ProxySelector =
when {
// Defer calls to ProxySelector.getDefault() because it can throw a SecurityException.
builder.proxy != null -> NullProxySelector
else -> builder.proxySelector ?: ProxySelector.getDefault() ?: NullProxySelector
}

@get:JvmName("proxyAuthenticator") val proxyAuthenticator: Authenticator =
builder.proxyAuthenticator

@get:JvmName("socketFactory") val socketFactory: SocketFactory = builder.socketFactory

private val sslSocketFactoryOrNull: SSLSocketFactory?

@get:JvmName("sslSocketFactory") val sslSocketFactory: SSLSocketFactory
get() = sslSocketFactoryOrNull ?: throw IllegalStateException("CLEARTEXT-only client")

@get:JvmName("x509TrustManager") val x509TrustManager: X509TrustManager?

@get:JvmName("connectionSpecs") val connectionSpecs: List<ConnectionSpec> =
builder.connectionSpecs

@get:JvmName("protocols") val protocols: List<Protocol> = builder.protocols

@get:JvmName("hostnameVerifier") val hostnameVerifier: HostnameVerifier = builder.hostnameVerifier

@get:JvmName("certificatePinner") val certificatePinner: CertificatePinner

@get:JvmName("certificateChainCleaner") val certificateChainCleaner: CertificateChainCleaner?

/**
* Default call timeout (in milliseconds). By default there is no timeout for complete calls, but
* there is for the connect, write, and read actions within a call.
*/
@get:JvmName("callTimeoutMillis") val callTimeoutMillis: Int = builder.callTimeout

/** Default connect timeout (in milliseconds). The default is 10 seconds. */
@get:JvmName("connectTimeoutMillis") val connectTimeoutMillis: Int = builder.connectTimeout

/** Default read timeout (in milliseconds). The default is 10 seconds. */
@get:JvmName("readTimeoutMillis") val readTimeoutMillis: Int = builder.readTimeout

/** Default write timeout (in milliseconds). The default is 10 seconds. */
@get:JvmName("writeTimeoutMillis") val writeTimeoutMillis: Int = builder.writeTimeout

/** Web socket and HTTP/2 ping interval (in milliseconds). By default pings are not sent. */
@get:JvmName("pingIntervalMillis") val pingIntervalMillis: Int = builder.pingInterval

/**
* Minimum outbound web socket message size (in bytes) that will be compressed.
* The default is 1024 bytes.
*/
@get:JvmName("minWebSocketMessageToCompress")
val minWebSocketMessageToCompress: Long = builder.minWebSocketMessageToCompress

val routeDatabase: RouteDatabase = builder.routeDatabase ?: RouteDatabase()

...
override fun newCall(request: Request): Call = RealCall(this, request, forWebSocket = false)
...

constructor() : this(Builder())

constructor() : this(Builder())
...

class Builder constructor() {
internal var dispatcher: Dispatcher = Dispatcher()
internal var connectionPool: ConnectionPool = ConnectionPool()
internal val interceptors: MutableList<Interceptor> = mutableListOf()
internal val networkInterceptors: MutableList<Interceptor> = mutableListOf()
internal var eventListenerFactory: EventListener.Factory = EventListener.NONE.asFactory()
internal var retryOnConnectionFailure = true
internal var authenticator: Authenticator = Authenticator.NONE
internal var followRedirects = true
internal var followSslRedirects = true
internal var cookieJar: CookieJar = CookieJar.NO_COOKIES
internal var cache: Cache? = null
internal var dns: Dns = Dns.SYSTEM
internal var proxy: Proxy? = null
internal var proxySelector: ProxySelector? = null
internal var proxyAuthenticator: Authenticator = Authenticator.NONE
internal var socketFactory: SocketFactory = SocketFactory.getDefault()
internal var sslSocketFactoryOrNull: SSLSocketFactory? = null
internal var x509TrustManagerOrNull: X509TrustManager? = null
internal var connectionSpecs: List<ConnectionSpec> = DEFAULT_CONNECTION_SPECS
internal var protocols: List<Protocol> = DEFAULT_PROTOCOLS
internal var hostnameVerifier: HostnameVerifier = OkHostnameVerifier
internal var certificatePinner: CertificatePinner = CertificatePinner.DEFAULT
internal var certificateChainCleaner: CertificateChainCleaner? = null
internal var callTimeout = 0
internal var connectTimeout = 10_000
internal var readTimeout = 10_000
internal var writeTimeout = 10_000
internal var pingInterval = 0
internal var minWebSocketMessageToCompress = RealWebSocket.DEFAULT_MINIMUM_DEFLATE_SIZE
internal var routeDatabase: RouteDatabase? = null

internal constructor(okHttpClient: OkHttpClient) : this() {
this.dispatcher = okHttpClient.dispatcher
this.connectionPool = okHttpClient.connectionPool
this.interceptors += okHttpClient.interceptors
this.networkInterceptors += okHttpClient.networkInterceptors
this.eventListenerFactory = okHttpClient.eventListenerFactory
this.retryOnConnectionFailure = okHttpClient.retryOnConnectionFailure
this.authenticator = okHttpClient.authenticator
this.followRedirects = okHttpClient.followRedirects
this.followSslRedirects = okHttpClient.followSslRedirects
this.cookieJar = okHttpClient.cookieJar
this.cache = okHttpClient.cache
this.dns = okHttpClient.dns
this.proxy = okHttpClient.proxy
this.proxySelector = okHttpClient.proxySelector
this.proxyAuthenticator = okHttpClient.proxyAuthenticator
this.socketFactory = okHttpClient.socketFactory
this.sslSocketFactoryOrNull = okHttpClient.sslSocketFactoryOrNull
this.x509TrustManagerOrNull = okHttpClient.x509TrustManager
this.connectionSpecs = okHttpClient.connectionSpecs
this.protocols = okHttpClient.protocols
this.hostnameVerifier = okHttpClient.hostnameVerifier
this.certificatePinner = okHttpClient.certificatePinner
this.certificateChainCleaner = okHttpClient.certificateChainCleaner
this.callTimeout = okHttpClient.callTimeoutMillis
this.connectTimeout = okHttpClient.connectTimeoutMillis
this.readTimeout = okHttpClient.readTimeoutMillis
this.writeTimeout = okHttpClient.writeTimeoutMillis
this.pingInterval = okHttpClient.pingIntervalMillis
this.minWebSocketMessageToCompress = okHttpClient.minWebSocketMessageToCompress
this.routeDatabase = okHttpClient.routeDatabase
}
}

很长,但是其实没啥难的,我们挑几个看看

ConnectionPool

连接池,目的是连接复用,如果地址相同的话,可以省略握手流程,省略新创建连接的内存

  • 还支持 HTTP2.0 的多路复用

networkInterceptors

它是一个 List<Interceptor>

EventListener.Factory

构建 EventListener

retryOnConnectionFailure

连接失败是否重试

Authenticator

处理身份验证的工具,可以用来刷新 token,或者重新登录,以下是示例代码:

1
2
3
4
5
6
7
8
9
10
11
12
13
14
val client = OkHttpClient.Builder()
.authenticator(object : Authenticator {
@Throws(IOException::class)
override fun authenticate(route: Route?, response: Response): Request? {
if (response.request.header("Authorization") != null) {
return null // Give up, we've already attempted to authenticate.
}

val credential = Credentials.basic("name", "password")
return response.request.newBuilder()
.header("Authorization", credential)
.build()
}
})

这段代码,判断了 ResponseheaderAuthorization 为空的时候,返回一个 request ,这里使用了 response.request.newBuilder() 而不是重新生成一个,是因为这个重新生成的可以保留一些信息,我们看看代码

1
fun newBuilder(): Builder = Builder(this)

我们看看这 Builder 的构造函数

1
2
3
4
5
6
7
8
9
10
11
12
13
14
15
internal constructor(request: Request) {
this.url = request.url
this.method = request.method
this.body = request.body
this.tags = if (request.tags.isEmpty()) {
mutableMapOf()
} else {
request.tags.toMutableMap()
}
this.headers = request.headers.newBuilder()
}

open fun url(url: HttpUrl): Builder = apply {
this.url = url
}

followRedirects

是否支持重定向

followSsLRedirects

http 与 https 的重定向

cookieJar

存放 Cookie 的“罐子” (cookie jar 就是饼干罐的意思,是一种英语的双关)

这个 CookieJar 默认是 NoCookie

Cache

是使用一个 DiskLruCache 实现的

Dns

通过 hostname ,返回一个 List<InetAddress>

Proxy

代理,分为三种

1
2
3
4
5
6
7
8
9
10
11
12
13
14
public enum Type {
/**
* Represents a direct connection, or the absence of a proxy.
*/
DIRECT,
/**
* Represents proxy for high level protocols such as HTTP or FTP.
*/
HTTP,
/**
* Represents a SOCKS (V4 or V5) proxy.
*/
SOCKS
};

ProxySelector

代理服务器选择器

proxyAuthenticator

代理服务器授权

SocketFactory

Socket 建立的工厂

SslSocketFactory

加密的 Socket 建立工厂

x509TrustManager

证书验证工具,x509 是一种证书格式

connectionSpecs

是一个 List<ConnectionSpec>ConnectionSpec 是连接协议的意思,点进去就能看到里面有一些加密套件的变量,包括 TlsVersioncipherSuites

ConnectionSpec 里面有几个提供的加密协议选项:

  • RESTRICTED_TLS:最严格的 TLS 支持,偏向于安全
  • MODERN_TLS:最大泛用的 TLS 支持,是 Okhttp 默认值
  • COMPATIBLE_TLS:最宽松的 TLS 支持,偏向于兼容性
  • CLEARTEXT:明文,也就是 HTTP 不加密

protocols

协议:分为 HTTP_1_0HTTP_1_1SPDY_3HTTP_2前身),HTTP_2H2_PRIOR_KNOWLEDGE(不加密的 HTTP_2),QUIC

hostnameVerifier

主机名验证

certificatePinner

约束哪些证书被信任。相当于给证书增加需要验证的步骤,比如 hash

1
2
3
4
5
6
7
8
val url = "https://api.github.com/users/octocat/repos"
val hostname = "api.github.com"
val certificatePinner = CertificatePinner.Builder()
.add(hostname, "sha256/qwerty")
.build()
val client = OkHttpClient.Builder()
.certificatePinner(certificatePinner)
.build()

输出结果:

1
2
3
4
5
6
7
javax.net.ssl.SSLPeerUnverifiedException: Certificate pinning failure!
Peer certificate chain:
sha256/1EkvzibgiE3k+xdsv+7UU5vhV8kdFCQiUiFdMX5Guuk=: CN=*.github.com
sha256/6YBE8kK4d5J1qu1wEjyoKqzEIvyRY5HyM/NB2wKdcZo=: CN=Sectigo ECC Domain Validation Secure Server CA, O=Sectigo Limited, L=Salford, ST=Greater Manchester, C=GB
sha256/ICGRfpgmOUXIWcQ/HXPLQTkFPEFPoDyjvH7ohhQpjzs=: CN=USERTrust ECC Certification Authority, O=The USERTRUST Network, L=Jersey City, ST=New Jersey, C=US
Pinned certificates for api.github.com:
sha256/qwertw==

这样第一次错了,后续就知道了证书的 sha256,就可以进行验证了

但这也有风险,由于 hash 是写在本地的,所以如果更换证书没有及时更新软件,就会导致验证失败

certificateChainCleaner

清洁证书链条返回一个证书列表

Call

1
override fun newCall(request: Request): Call = RealCall(this, request, forWebSocket = false)

这个 Call 有三个参数

  • 第一个 OkHttpClient 刚才我们已经看过了,它包含了很多配置信息,相当于一个大总管。

  • 第二个 request 刚才我们也看了,他就是一个 Http 请求的代码化文件

    这里写了 originalRequest 这是一个初始的 Request

  • 第三个是 forWebSocket 这个是一个是否支持 WebSocket 的开关

    • 传统 HTTP 是请求-响应模式:客户端发请求,服务器返回数据,然后连接断开。

    • WebSocket 则是在最开始通过 HTTP 协议进行一次握手(”升级协议”),握手成功后,客户端和服务器之间的连接会保持打开,双方可以随时主动发送数据。

所以,newCall 本质是创建了一个 RealCall ,我们看看这个 RealCall,同时也看看这个 RealCallenqueue

Call.enqueue()

1
2
3
4
5
6
7
// RealCall.kt
override fun enqueue(responseCallback: Callback) {
check(executed.compareAndSet(false, true)) { "Already Executed" }

callStart()
client.dispatcher.enqueue(AsyncCall(responseCallback))
}
  • 第一行是检查是不是已经在运行了

  • 第二行 callStart 我们看看

    1
    2
    3
    4
    5
    // RealCall.kt
    private fun callStart() {
    this.callStackTrace = Platform.get().getStackTraceForCloseable("response.body().close()")
    eventListener.callStart(this)
    }
    • 这里生成了一个 callStackTrace 这个是用来跟踪堆栈,跟踪错误信息的

    • 然后是一个 eventListener 事件监听器,用于监听各种事件,比如 TCP 的建立和关闭,Header 开始发送接收……

  • 第三行是 enqueue 这个函数的核心逻辑,里面调用了一个 client.dispatcher.enqueue 参数填写的是 AsyncCall

    • 我们先看看 dispatcher ,这个 Dispatcher 这个类是做线程调度的,里面用的是 Java 的 Executor ,代码不用深究

      1
      2
      3
      4
      5
      6
      7
      8
      9
      10
      11
      12
      13
      14
      // Dispatcher.kt
      internal fun enqueue(call: AsyncCall) {
      synchronized(this) {
      readyAsyncCalls.add(call)

      // Mutate the AsyncCall so that it shares the AtomicInteger of an existing running call to
      // the same host.
      if (!call.call.forWebSocket) {
      val existingCall = findExistingCallWithHost(call.host)
      if (existingCall != null) call.reuseCallsPerHostFrom(existingCall)
      }
      }
      promoteAndExecute()
      }

      这个函数就是将 AsyncCall 添加进 readyAsyncCalls 里面,然后调用 promoteAndExecute

      readyAsyncCall 是一个双向队列,里面放的是那些准备要执行的 Call,我们看看 promoteAndExecute

      1
      2
      3
      4
      5
      6
      7
      8
      9
      10
      11
      12
      13
      14
      15
      16
      17
      18
      19
      20
      21
      22
      23
      24
      25
      26
      27
      28
      29
      // Dispatcher.kt
      private fun promoteAndExecute(): Boolean {
      this.assertThreadDoesntHoldLock()

      val executableCalls = mutableListOf<AsyncCall>()
      val isRunning: Boolean
      synchronized(this) {
      val i = readyAsyncCalls.iterator()
      while (i.hasNext()) {
      val asyncCall = i.next()

      if (runningAsyncCalls.size >= this.maxRequests) break // Max capacity.
      if (asyncCall.callsPerHost.get() >= this.maxRequestsPerHost) continue // Host max capacity.

      i.remove()
      asyncCall.callsPerHost.incrementAndGet()
      executableCalls.add(asyncCall)
      runningAsyncCalls.add(asyncCall)
      }
      isRunning = runningCallsCount() > 0
      }

      for (i in 0 until executableCalls.size) {
      val asyncCall = executableCalls[i]
      asyncCall.executeOn(executorService)
      }

      return isRunning
      }

      promote 有提升的意思,在这里是将等待执行的 CallreadyAsyncCalls 中拿出来,放进 executableCallsrunningAsyncCalls 里面

      我们看下后面的 25 行,asyncCall.executeOn(executorService) 是用来将 Call 执行的,我们来看看他到底怎么执行的

      1
      2
      3
      4
      5
      6
      7
      8
      9
      10
      11
      12
      13
      14
      15
      16
      17
      18
      fun executeOn(executorService: ExecutorService) {
      client.dispatcher.assertThreadDoesntHoldLock()

      var success = false
      try {
      executorService.execute(this)
      success = true
      } catch (e: RejectedExecutionException) {
      val ioException = InterruptedIOException("executor rejected")
      ioException.initCause(e)
      noMoreExchanges(ioException)
      responseCallback.onFailure(this@RealCall, ioException)
      } finally {
      if (!success) {
      client.dispatcher.finished(this) // This call is no longer running!
      }
      }
      }

      这里面的核心代码是 executorService.execute(this) ,这个 execute 方法参数是 Runnable 我们看看 run 里面怎么实现的

      1
      2
      3
      4
      5
      6
      7
      8
      9
      10
      11
      12
      13
      14
      15
      16
      17
      18
      19
      20
      21
      22
      23
      24
      25
      26
      27
      28
      override fun run() {
      threadName("OkHttp ${redactedUrl()}") {
      var signalledCallback = false
      timeout.enter()
      try {
      val response = getResponseWithInterceptorChain()
      signalledCallback = true
      responseCallback.onResponse(this@RealCall, response)
      } catch (e: IOException) {
      if (signalledCallback) {
      // Do not signal the callback twice!
      Platform.get().log("Callback failure for ${toLoggableString()}", Platform.INFO, e)
      } else {
      responseCallback.onFailure(this@RealCall, e)
      }
      } catch (t: Throwable) {
      cancel()
      if (!signalledCallback) {
      val canceledException = IOException("canceled due to $t")
      canceledException.addSuppressed(t)
      responseCallback.onFailure(this@RealCall, canceledException)
      }
      throw t
      } finally {
      client.dispatcher.finished(this)
      }
      }
      }

      这里代码里的核心代码是 val response = getResponseWithInterceptorChain()

      这里获得 response ,然后后面回调 responseCallback.onResponse

      从这里我们知道了 OkHttp 的回调是在子线程里也就是 ExecutorService 的线程里,所以在 Android 开发中需要进行切回主线程,而且当遇到返回 token 需要再一次进行访问的时候,可以直接在回调里使用 Call.execute()

自此,我们就知道了这个 enqueue 的流程

我们再看看 Call.execute()

Call.execute()

1
2
3
4
5
6
7
8
9
10
11
12
override fun execute(): Response {
check(executed.compareAndSet(false, true)) { "Already Executed" }

timeout.enter()
callStart()
try {
client.dispatcher.executed(this)
return getResponseWithInterceptorChain()
} finally {
client.dispatcher.finished(this)
}
}

这个是个 Call.enqueue 和相似的,核心代码就是 try 的两行:

1
2
client.dispatcher.executed(this)
return getResponseWithInterceptorChain()

然后我们接下来直接来看这个 getResponseWithInterceptorChain 到底是干嘛的

网络请求流程

getResponseWithInterceptorChain()

1
2
3
4
5
6
7
8
9
10
11
12
13
14
15
16
17
18
19
20
21
22
23
24
25
26
27
28
29
30
31
32
33
34
35
36
37
38
39
40
41
42
43
44
// RealCall.kt

@Throws(IOException::class)
internal fun getResponseWithInterceptorChain(): Response {
// Build a full stack of interceptors.
val interceptors = mutableListOf<Interceptor>()
interceptors += client.interceptors
interceptors += RetryAndFollowUpInterceptor(client)
interceptors += BridgeInterceptor(client.cookieJar)
interceptors += CacheInterceptor(client.cache)
interceptors += ConnectInterceptor
if (!forWebSocket) {
interceptors += client.networkInterceptors
}
interceptors += CallServerInterceptor(forWebSocket)

val chain = RealInterceptorChain(
call = this,
interceptors = interceptors,
index = 0,
exchange = null,
request = originalRequest,
connectTimeoutMillis = client.connectTimeoutMillis,
readTimeoutMillis = client.readTimeoutMillis,
writeTimeoutMillis = client.writeTimeoutMillis
)

var calledNoMoreExchanges = false
try {
val response = chain.proceed(originalRequest)
if (isCanceled()) {
response.closeQuietly()
throw IOException("Canceled")
}
return response
} catch (e: IOException) {
calledNoMoreExchanges = true
throw noMoreExchanges(e) as Throwable
} finally {
if (!calledNoMoreExchanges) {
noMoreExchanges(null)
}
}
}

我们看到他先是声明了一个名为 interceptorsmutableListOf<Interceptor>()

然后依次添加各种 interceptor 到这个 List 里面

interceptors

然后继续往下看,它生成了一个名为 chainRealInterceptorChain

然后后面调用了 chain.proceed(originalRequest),我们继续往里追

1
2
3
4
5
6
7
8
9
10
11
12
13
14
15
16
17
18
19
20
21
22
23
24
25
26
27
28
29
30
31
32
33
34
35
// RealInterceptorChain.kt

@Throws(IOException::class)
override fun proceed(request: Request): Response {
check(index < interceptors.size)

calls++

if (exchange != null) {
check(exchange.finder.sameHostAndPort(request.url)) {
"network interceptor ${interceptors[index - 1]} must retain the same host and port"
}
check(calls == 1) {
"network interceptor ${interceptors[index - 1]} must call proceed() exactly once"
}
}

// Call the next interceptor in the chain.
val next = copy(index = index + 1, request = request)
val interceptor = interceptors[index]

@Suppress("USELESS_ELVIS")
val response = interceptor.intercept(next) ?: throw NullPointerException(
"interceptor $interceptor returned null")

if (exchange != null) {
check(index + 1 >= interceptors.size || next.calls == 1) {
"network interceptor $interceptor must call proceed() exactly once"
}
}

check(response.body != null) { "interceptor $interceptor returned a response with no body" }

return response
}

我们看第 18 行,它从 interceptors 中选了一个去执行 interceptor.intercept(next) ,并且我们看第 17 行他每次调用都会将 index + 1 传入,而 next 本身值并没有变(indexRealInterceptorChain 的构造函数中传进来),我们简单看一下这个 copy 函数

RealInterceptorChain.copy()

1
2
3
4
5
6
7
8
9
10
11
// RealInterceptorChain.kt

internal fun copy(
index: Int = this.index,
exchange: Exchange? = this.exchange,
request: Request = this.request,
connectTimeoutMillis: Int = this.connectTimeoutMillis,
readTimeoutMillis: Int = this.readTimeoutMillis,
writeTimeoutMillis: Int = this.writeTimeoutMillis
) = RealInterceptorChain(call, interceptors, index, exchange, request, connectTimeoutMillis,
readTimeoutMillis, writeTimeoutMillis)

可以看到,这个 copy 函数的 index 默认值是当前 RealInterceptorChainindex ,所以传入 index + 1 就是在这个链上往后移动一下

为了搞清楚这个 interceptor.intercept(Chain) 具体干了什么,我们得去看看它的实现类 Interceptor

既然如此我们一个个看刚才的 Interceptor

client.interceptors

这个 clientOkHttpClient,我们返回看到 OkHttpClient 里看:

1
2
@get:JvmName("interceptors") val interceptors: List<Interceptor> =
builder.interceptors.toImmutableList()

这个 interceptors 是一个 List<Interceptor> ,并且在 builder 中初始化,我们看看 Builder

1
2
3
fun addInterceptor(interceptor: Interceptor) = apply {
interceptors += interceptor
}

这个 BuilderaddInterceptor 就是来添加拦截器的,也就是用户自定义的拦截器,里面的实现要用户自己实现

RetryAndFollowUpInterceptor

这个拦截器的工作就是将出现失败的网络连接或者需要重定向的网络连接进行重试请求

1
2
3
4
5
6
7
8
9
10
11
12
13
14
15
16
17
18
19
20
21
22
23
24
25
26
27
28
29
30
31
32
33
34
35
36
37
38
39
40
41
42
43
44
45
46
47
48
49
50
51
52
53
54
55
56
57
58
59
60
61
62
63
64
65
66
67
68
69
70
71
72
73
74
75
76
77
78
79
80
81
82
83
// RetryAndFollowUpInterceptor.kt

@Throws(IOException::class)
override fun intercept(chain: Interceptor.Chain): Response {
val realChain = chain as RealInterceptorChain
var request = chain.request
val call = realChain.call
var followUpCount = 0
var priorResponse: Response? = null
var newExchangeFinder = true
var recoveredFailures = listOf<IOException>()
while (true) {
call.enterNetworkInterceptorExchange(request, newExchangeFinder)

var response: Response
var closeActiveExchange = true
try {
if (call.isCanceled()) {
throw IOException("Canceled")
}

try {
response = realChain.proceed(request)
newExchangeFinder = true
} catch (e: RouteException) {
// The attempt to connect via a route failed. The request will not have been sent.
if (!recover(e.lastConnectException, call, request, requestSendStarted = false)) {
throw e.firstConnectException.withSuppressed(recoveredFailures)
} else {
recoveredFailures += e.firstConnectException
}
newExchangeFinder = false
continue
} catch (e: IOException) {
// An attempt to communicate with a server failed. The request may have been sent.
if (!recover(e, call, request, requestSendStarted = e !is ConnectionShutdownException)) {
throw e.withSuppressed(recoveredFailures)
} else {
recoveredFailures += e
}
newExchangeFinder = false
continue
}

// Attach the prior response if it exists. Such responses never have a body.
if (priorResponse != null) {
response = response.newBuilder()
.priorResponse(priorResponse.newBuilder()
.body(null)
.build())
.build()
}

val exchange = call.interceptorScopedExchange
val followUp = followUpRequest(response, exchange)

if (followUp == null) {
if (exchange != null && exchange.isDuplex) {
call.timeoutEarlyExit()
}
closeActiveExchange = false
return response
}

val followUpBody = followUp.body
if (followUpBody != null && followUpBody.isOneShot()) {
closeActiveExchange = false
return response
}

response.body?.closeQuietly()

if (++followUpCount > MAX_FOLLOW_UPS) {
throw ProtocolException("Too many follow-up requests: $followUpCount")
}

request = followUp
priorResponse = response
} finally {
call.exitNetworkInterceptorExchange(closeActiveExchange)
}
}
}

可以看到这个 RetryAndFollowUpInterceptor.intercept,里面是一个 while(true) 循环,并且你找不到 break,但是他有 continuereturnthrow 这意味着这个死循环并不会被主动取消,而是会不断重试,直到出现错误或者获得结果

继续往后执行的代码在于第 23 行的 response = realChain.proceed(request)

同样的调用就已经在 RealCall 里调用过了,我们来具体分析下这里的代码逻辑

  1. getResponseWithInterceptorChain 里生成一个 RealInterceptorChain ,调用 chain.proceed

    chain 默认内容如下:

    image-20250507160702107

  2. 然后在 chain.proceed 里调用如下代码:

    1
    2
    3
    4
    val next = copy(index = index + 1, request = request)
    val interceptor = interceptors[index]
    @Suppress("USELESS_ELVIS")
    val response = interceptor.intercept(next) ?: throw NullPointerException("interceptor $interceptor returned null")

    这段代码挺让人疑惑的,尤其是这个 index

    copy 只是生成一个 index+1chain

    而这个 interceptors[index] 使用的还是当前 chainindex

    在默认情况下,第一次调用的时候,就是使用 copy 生成一个 index 为 1 的 chain ,然后用第 0 个 interceptor 也就是 RetryAndFollowUpInterceptor 调用 intercept(next)

  3. 调用了 interceptor.intercept(next) 就会调用 RetryAndFollowUpInterceptor.intercept(next)

    这个函数里有一个 while 循环,因为这是 RetryAndFollowUpInterceptor ,需要实现的功能就是一遍遍的重试

    然后调用 response = realChain.proceed(request) 继续推进

  4. 重复第 2 步,继续调用下一个 Interceptor

这也就是这拦截链请求的代码逻辑

回到 RetryAndFollowUpInterceptor ,它往后推进逻辑就是 proceed(requset) ,所以就会在 request 里进行更改,以便下次请求

我们大体框架了解了之后,现在继续回归 RetryAndFollowUpInterceptor 在执行推进逻辑的时候,会有一些前置工作和一些后置工作

1
call.enterNetworkInterceptorExchange(request, newExchangeFinder)

这个函数我们看看里面做了什么

1
2
3
4
5
6
7
8
9
10
11
12
13
14
15
16
17
18
19
20
fun enterNetworkInterceptorExchange(request: Request, newExchangeFinder: Boolean) {
check(interceptorScopedExchange == null)

synchronized(this) {
check(!responseBodyOpen) {
"cannot make a new request because the previous response is still open: " +
"please call response.close()"
}
check(!requestBodyOpen)
}

if (newExchangeFinder) {
this.exchangeFinder = ExchangeFinder(
connectionPool,
createAddress(request.url),
this,
eventListener
)
}
}

这里的最关键的代码就是

1
2
3
4
5
6
this.exchangeFinder = ExchangeFinder(
connectionPool,
createAddress(request.url),
this,
eventListener
)

在 HTTP 协议中,”exchange”(交换)指的是 一次完整的请求-响应交互过程,也就是:客户端发送一个请求,服务器返回一个响应,这整个过程称为一次 HTTP exchange。

可以看到参数里有一个 connectionPool ,而这 ExchangeFinder 就是在这里连接池里寻找一个连接

后置工作就是在失败或者重复的时候,就调用 continue 进行再次请求

  • 也就是说这个拦截器,会有一些前置工作

  • 做完前置工作之后,会使用 chain.proceed(request) 推进到下一个 Interceptor.intercept() 里面

  • 等到返回 response 之后,或者被 try-catch 捕捉之后,再执行一些后置工作

然后我们此时就应该继续看 chain.proceed 也就是继续看下一个 Interceptorintercept

BridgeInterceptor

1
2
3
4
5
6
7
8
9
10
11
12
13
14
15
16
17
18
19
20
21
22
23
24
25
26
27
28
29
30
31
32
33
34
35
36
37
38
39
40
41
42
43
44
45
46
47
48
49
50
51
52
53
54
55
56
57
58
59
60
61
62
63
64
65
66
67
68
69
70
71
72
73
74
// BridgeInterceptor.kt

@Throws(IOException::class)
override fun intercept(chain: Interceptor.Chain): Response {
val userRequest = chain.request()
val requestBuilder = userRequest.newBuilder()

val body = userRequest.body
if (body != null) {
val contentType = body.contentType()
if (contentType != null) {
requestBuilder.header("Content-Type", contentType.toString())
}

val contentLength = body.contentLength()
if (contentLength != -1L) {
requestBuilder.header("Content-Length", contentLength.toString())
requestBuilder.removeHeader("Transfer-Encoding")
} else {
requestBuilder.header("Transfer-Encoding", "chunked")
requestBuilder.removeHeader("Content-Length")
}
}

if (userRequest.header("Host") == null) {
requestBuilder.header("Host", userRequest.url.toHostHeader())
}

if (userRequest.header("Connection") == null) {
requestBuilder.header("Connection", "Keep-Alive")
}

// If we add an "Accept-Encoding: gzip" header field we're responsible for also decompressing
// the transfer stream.
var transparentGzip = false
if (userRequest.header("Accept-Encoding") == null && userRequest.header("Range") == null) {
transparentGzip = true
requestBuilder.header("Accept-Encoding", "gzip")
}

val cookies = cookieJar.loadForRequest(userRequest.url)
if (cookies.isNotEmpty()) {
requestBuilder.header("Cookie", cookieHeader(cookies))
}

if (userRequest.header("User-Agent") == null) {
requestBuilder.header("User-Agent", userAgent)
}

val networkResponse = chain.proceed(requestBuilder.build())

cookieJar.receiveHeaders(userRequest.url, networkResponse.headers)

val responseBuilder = networkResponse.newBuilder()
.request(userRequest)

if (transparentGzip &&
"gzip".equals(networkResponse.header("Content-Encoding"), ignoreCase = true) &&
networkResponse.promisesBody()) {
val responseBody = networkResponse.body
if (responseBody != null) {
val gzipSource = GzipSource(responseBody.source())
val strippedHeaders = networkResponse.headers.newBuilder()
.removeAll("Content-Encoding")
.removeAll("Content-Length")
.build()
responseBuilder.headers(strippedHeaders)
val contentType = networkResponse.header("Content-Type")
responseBuilder.body(RealResponseBody(contentType, -1L, gzipSource.buffer()))
}
}

return responseBuilder.build()
}

这个拦截器的目的是在应用层和网络层之间架起桥梁,完成 HTTP 请求和响应过程中的一些标准化处理,比如:

  1. 添加请求头
  • User-Agent:如果用户没有手动添加,会自动添加一个默认的。
  • HostConnection:如果没有,会自动补充。
  • Accept-Encoding:默认添加 "gzip",以支持响应内容的压缩。
  • Cookie:如果使用了 CookieJar,会自动添加相应的 Cookie。
  • Content-Type、Content-Length / Transfer-Encoding:根据请求体的存在情况自动补充。
  1. 处理请求体压缩
  • 如果 Accept-Encoding: gzip 被添加,BridgeInterceptor 会自动处理对响应体的解压。
  1. 接收响应并处理压缩内容
  • 如果响应头中有 Content-Encoding: gzip,它会自动将响应体解压缩(GZIP 解码)。
  1. 接收 Set-Cookie
  • 会将服务器返回的 Set-Cookie 交给 CookieJar 进行持久化或保存。

所以我们发现和 RetryAndFollowUpInterceptor 一样,都有一些前置工作、中置工作和后置工作,但中置工作都是 chain.proceed 推进到下个拦截器,前置工作是衔接上个拦截器,而后置工作是处理下个拦截器返回的 response

CacheInterceptor

1
2
3
4
5
6
7
8
9
10
11
12
13
14
15
16
17
18
19
20
21
22
23
24
25
26
27
28
29
30
31
32
33
34
35
36
37
38
39
40
41
42
43
44
45
46
47
48
49
50
51
52
53
54
55
56
57
58
59
60
61
62
63
64
65
66
67
68
69
70
71
72
73
74
75
76
77
78
79
80
81
82
83
84
85
86
87
88
89
90
91
92
93
94
95
96
97
98
99
100
101
102
103
104
105
106
107
108
109
110
111
override fun intercept(chain: Interceptor.Chain): Response {
val call = chain.call()
val cacheCandidate = cache?.get(chain.request())

val now = System.currentTimeMillis()

val strategy = CacheStrategy.Factory(now, chain.request(), cacheCandidate).compute()
val networkRequest = strategy.networkRequest
val cacheResponse = strategy.cacheResponse

cache?.trackResponse(strategy)
val listener = (call as? RealCall)?.eventListener ?: EventListener.NONE

if (cacheCandidate != null && cacheResponse == null) {
// The cache candidate wasn't applicable. Close it.
cacheCandidate.body?.closeQuietly()
}

// If we're forbidden from using the network and the cache is insufficient, fail.
if (networkRequest == null && cacheResponse == null) {
return Response.Builder()
.request(chain.request())
.protocol(Protocol.HTTP_1_1)
.code(HTTP_GATEWAY_TIMEOUT)
.message("Unsatisfiable Request (only-if-cached)")
.body(EMPTY_RESPONSE)
.sentRequestAtMillis(-1L)
.receivedResponseAtMillis(System.currentTimeMillis())
.build().also {
listener.satisfactionFailure(call, it)
}
}

// If we don't need the network, we're done.
if (networkRequest == null) {
return cacheResponse!!.newBuilder()
.cacheResponse(stripBody(cacheResponse))
.build().also {
listener.cacheHit(call, it)
}
}

if (cacheResponse != null) {
listener.cacheConditionalHit(call, cacheResponse)
} else if (cache != null) {
listener.cacheMiss(call)
}

var networkResponse: Response? = null
try {
networkResponse = chain.proceed(networkRequest)
} finally {
// If we're crashing on I/O or otherwise, don't leak the cache body.
if (networkResponse == null && cacheCandidate != null) {
cacheCandidate.body?.closeQuietly()
}
}

// If we have a cache response too, then we're doing a conditional get.
if (cacheResponse != null) {
if (networkResponse?.code == HTTP_NOT_MODIFIED) {
val response = cacheResponse.newBuilder()
.headers(combine(cacheResponse.headers, networkResponse.headers))
.sentRequestAtMillis(networkResponse.sentRequestAtMillis)
.receivedResponseAtMillis(networkResponse.receivedResponseAtMillis)
.cacheResponse(stripBody(cacheResponse))
.networkResponse(stripBody(networkResponse))
.build()

networkResponse.body!!.close()

// Update the cache after combining headers but before stripping the
// Content-Encoding header (as performed by initContentStream()).
cache!!.trackConditionalCacheHit()
cache.update(cacheResponse, response)
return response.also {
listener.cacheHit(call, it)
}
} else {
cacheResponse.body?.closeQuietly()
}
}

val response = networkResponse!!.newBuilder()
.cacheResponse(stripBody(cacheResponse))
.networkResponse(stripBody(networkResponse))
.build()

if (cache != null) {
if (response.promisesBody() && CacheStrategy.isCacheable(response, networkRequest)) {
// Offer this request to the cache.
val cacheRequest = cache.put(response)
return cacheWritingResponse(cacheRequest, response).also {
if (cacheResponse != null) {
// This will log a conditional cache miss only.
listener.cacheMiss(call)
}
}
}

if (HttpMethod.invalidatesCache(networkRequest.method)) {
try {
cache.remove(networkRequest)
} catch (_: IOException) {
// The cache cannot be written.
}
}
}

return response
}

依据前两个拦截器的信息,我们可以猜到这个拦截器也是分为前置工作、中置工作、后置工作

CatchInterceptor 也确实,前置工作就是找找缓存里有没有数据,没有的话直接返回,没有的话,再去做请求

ConnectInterceptor

1
2
3
4
5
6
7
// ConnectInterceptor.kt
override fun intercept(chain: Interceptor.Chain): Response {
val realChain = chain as RealInterceptorChain
val exchange = realChain.call.initExchange(chain)
val connectedChain = realChain.copy(exchange = exchange)
return connectedChain.proceed(realChain.request)
}

这是最重要的一个拦截器,这个拦截器我们发现它没有前面的后置工作,到 connectedChain.proceed(realChain.request) 就结束了

这个拦截器的工作就是建立连接,前置工作的关键在于 realChain.call.initExchange(chain) 我们点开看看:

realChain.call.initExchange(chain)

1
2
3
4
5
6
7
8
9
10
11
12
13
14
15
16
17
18
19
20
21
22
// RealCall.kt

internal fun initExchange(chain: RealInterceptorChain): Exchange {
synchronized(this) {
check(expectMoreExchanges) { "released" }
check(!responseBodyOpen)
check(!requestBodyOpen)
}

val exchangeFinder = this.exchangeFinder!!
val codec = exchangeFinder.find(client, chain)
val result = Exchange(this, eventListener, exchangeFinder, codec)
this.interceptorScopedExchange = result
this.exchange = result
synchronized(this) {
this.requestBodyOpen = true
this.responseBodyOpen = true
}

if (canceled) throw IOException("Canceled")
return result
}

先是通过 HTTP 的格式找到一个 codec (编解码器) ,然后用这个 codec 拼成一个 exchange

这个 codec 就是 Encodes HTTP requests and decodes HTTP responses.

我们看看它是如何生成的,我们点进 exchangeFinder.find(client, chain)

1
2
3
4
5
6
7
8
9
10
11
12
13
14
15
16
17
18
19
20
21
// ExchangeFinder.kt

fun find(client: OkHttpClient,chain: RealInterceptorChain): ExchangeCodec {
try {
val resultConnection = findHealthyConnection(
connectTimeout = chain.connectTimeoutMillis,
readTimeout = chain.readTimeoutMillis,
writeTimeout = chain.writeTimeoutMillis,
pingIntervalMillis = client.pingIntervalMillis,
connectionRetryEnabled = client.retryOnConnectionFailure,
doExtensiveHealthChecks = chain.request.method != "GET"
)
return resultConnection.newCodec(client, chain)
} catch (e: RouteException) {
trackFailure(e.lastConnectException)
throw e
} catch (e: IOException) {
trackFailure(e)
throw RouteException(e)
}
}

这里有一个 findHealthyConnection 找到一个健康的连接,然后再通过 resultConnection.newCodec 生成一个 codec

我们再追这个 findHealthyConnection

findHealthyConnection

1
2
3
4
5
6
7
8
9
10
11
12
13
14
15
16
17
18
19
20
21
22
23
24
25
26
27
28
29
30
31
32
33
34
35
36
37
38
39
40
41
// ExchangeFinder.kt

@Throws(IOException::class)
private fun findHealthyConnection(
connectTimeout: Int,
readTimeout: Int,
writeTimeout: Int,
pingIntervalMillis: Int,
connectionRetryEnabled: Boolean,
doExtensiveHealthChecks: Boolean
): RealConnection {
while (true) {
val candidate = findConnection(
connectTimeout = connectTimeout,
readTimeout = readTimeout,
writeTimeout = writeTimeout,
pingIntervalMillis = pingIntervalMillis,
connectionRetryEnabled = connectionRetryEnabled
)

// Confirm that the connection is good.
if (candidate.isHealthy(doExtensiveHealthChecks)) {
return candidate
}

// If it isn't, take it out of the pool.
candidate.noNewExchanges()

// Make sure we have some routes left to try. One example where we may exhaust all the routes
// would happen if we made a new connection and it immediately is detected as unhealthy.
if (nextRouteToTry != null) continue

val routesLeft = routeSelection?.hasNext() ?: true
if (routesLeft) continue

val routesSelectionLeft = routeSelector?.hasNext() ?: true
if (routesSelectionLeft) continue

throw IOException("exhausted all routes")
}
}

这里面就分三步

  1. findConnection 找到一个连接
  2. candidate.isHealthy 判断这个连接是否健康,健康就返回,不健康就将他移出连接池
  3. 如果还有其他可尝试从途径,就 continue 再次进入循环再找个连接

我们看看如何拿到这个连接,我们点进 findConnection

findConnection

1
2
3
4
5
6
7
8
9
10
11
12
13
14
15
16
17
18
19
20
21
22
23
24
25
26
27
28
29
30
31
32
33
34
35
36
37
38
39
40
41
42
43
44
45
46
47
48
49
50
51
52
53
54
55
56
57
58
59
60
61
62
63
64
65
66
67
68
69
70
71
72
73
74
75
76
77
78
79
80
81
82
83
84
85
86
87
88
89
90
91
92
93
94
95
96
97
98
99
100
101
102
103
104
105
106
107
108
109
110
111
112
113
114
115
116
117
118
// ExchangeFinder.kt

@Throws(IOException::class)
private fun findConnection(
connectTimeout: Int,
readTimeout: Int,
writeTimeout: Int,
pingIntervalMillis: Int,
connectionRetryEnabled: Boolean
): RealConnection {
if (call.isCanceled()) throw IOException("Canceled")

// Attempt to reuse the connection from the call.
val callConnection = call.connection // This may be mutated by releaseConnectionNoEvents()!
if (callConnection != null) {
var toClose: Socket? = null
synchronized(callConnection) {
if (callConnection.noNewExchanges || !sameHostAndPort(callConnection.route().address.url)) {
toClose = call.releaseConnectionNoEvents()
}
}

// If the call's connection wasn't released, reuse it. We don't call connectionAcquired() here
// because we already acquired it.
if (call.connection != null) {
check(toClose == null)
return callConnection
}

// The call's connection was released.
toClose?.closeQuietly()
eventListener.connectionReleased(call, callConnection)
}

// We need a new connection. Give it fresh stats.
refusedStreamCount = 0
connectionShutdownCount = 0
otherFailureCount = 0

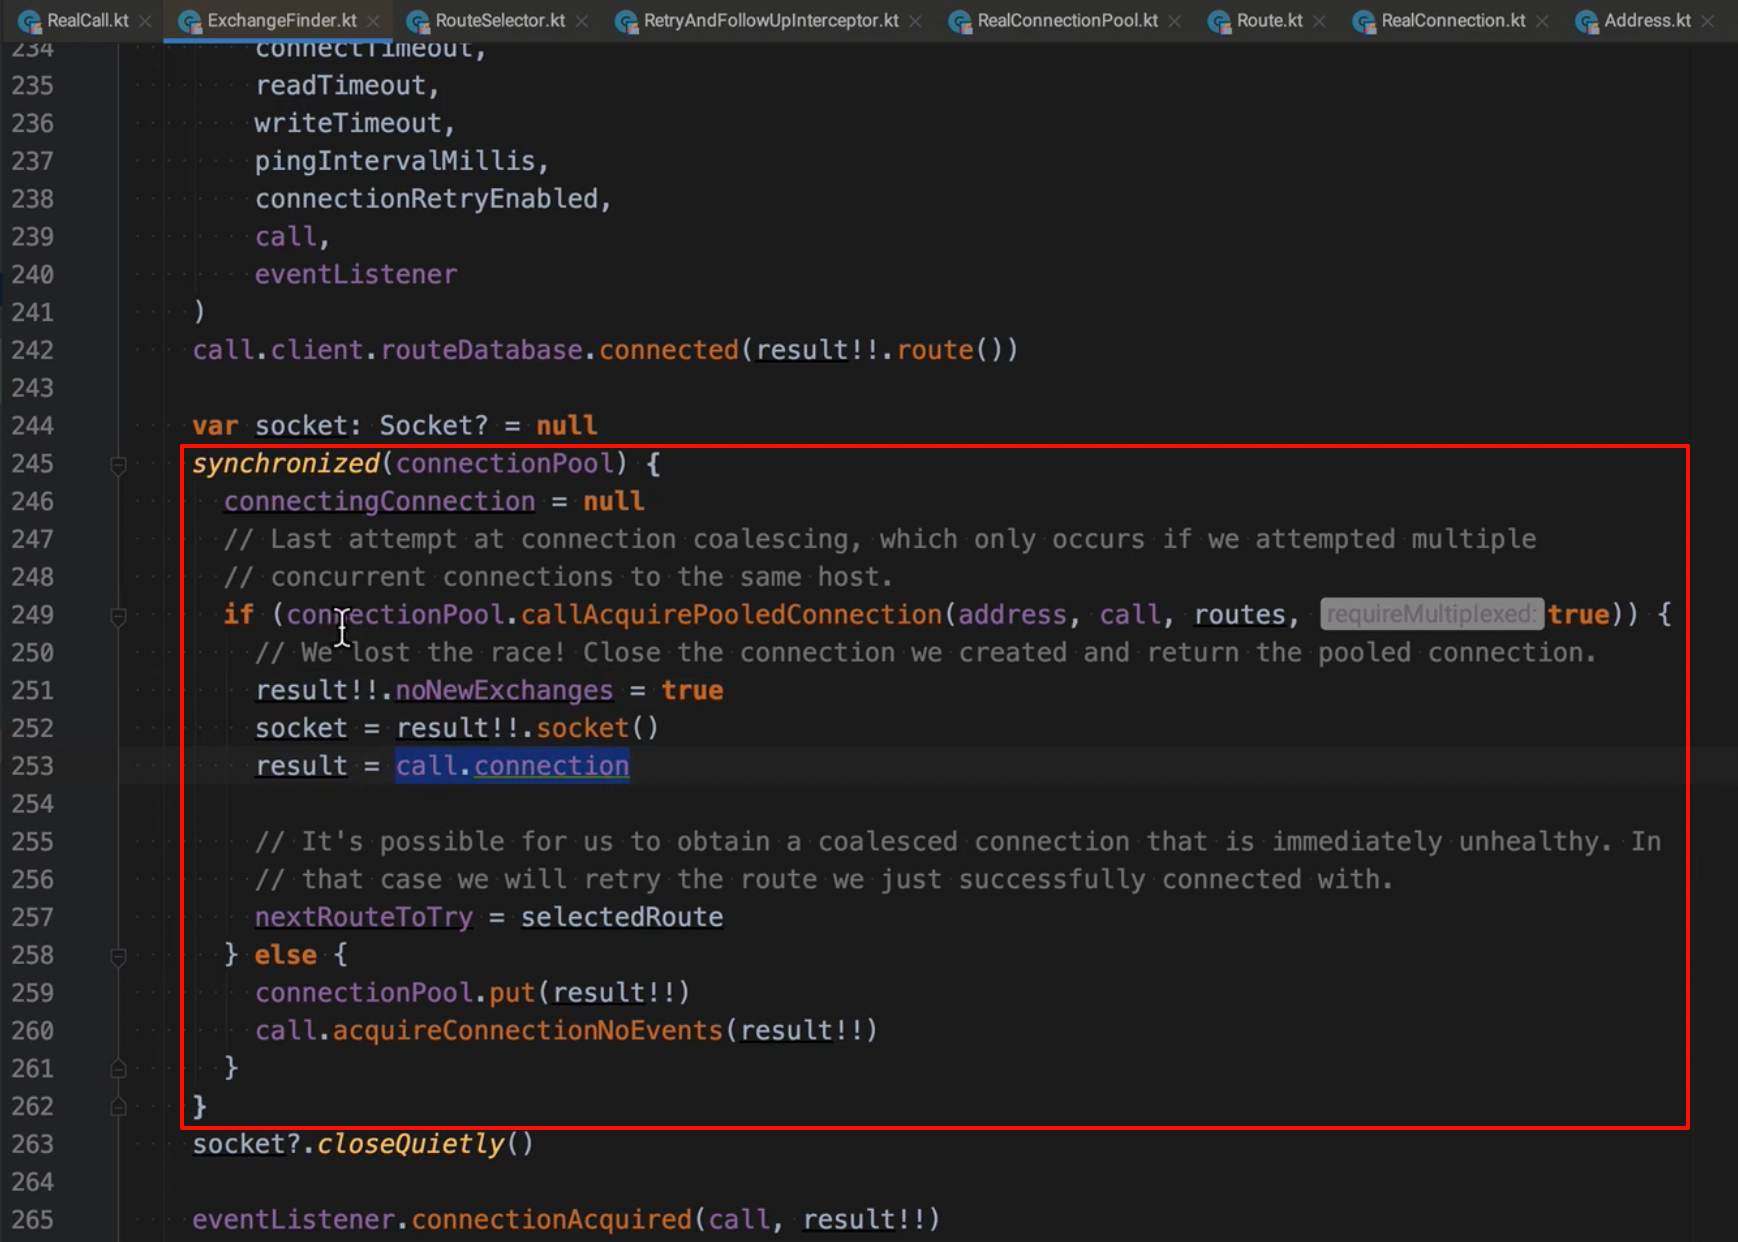
// Attempt to get a connection from the pool.
if (connectionPool.callAcquirePooledConnection(address, call, null, false)) {
val result = call.connection!!
eventListener.connectionAcquired(call, result)
return result
}

// Nothing in the pool. Figure out what route we'll try next.
val routes: List<Route>?
val route: Route
if (nextRouteToTry != null) {
// Use a route from a preceding coalesced connection.
routes = null
route = nextRouteToTry!!
nextRouteToTry = null
} else if (routeSelection != null && routeSelection!!.hasNext()) {
// Use a route from an existing route selection.
routes = null
route = routeSelection!!.next()
} else {
// Compute a new route selection. This is a blocking operation!
var localRouteSelector = routeSelector
if (localRouteSelector == null) {
localRouteSelector = RouteSelector(address, call.client.routeDatabase, call, eventListener)
this.routeSelector = localRouteSelector
}
val localRouteSelection = localRouteSelector.next()
routeSelection = localRouteSelection
routes = localRouteSelection.routes

if (call.isCanceled()) throw IOException("Canceled")

// Now that we have a set of IP addresses, make another attempt at getting a connection from
// the pool. We have a better chance of matching thanks to connection coalescing.
if (connectionPool.callAcquirePooledConnection(address, call, routes, false)) {
val result = call.connection!!
eventListener.connectionAcquired(call, result)
return result
}

route = localRouteSelection.next()
}

// Connect. Tell the call about the connecting call so async cancels work.
val newConnection = RealConnection(connectionPool, route)
call.connectionToCancel = newConnection
try {
newConnection.connect(
connectTimeout,
readTimeout,
writeTimeout,
pingIntervalMillis,
connectionRetryEnabled,
call,
eventListener
)
} finally {
call.connectionToCancel = null
}
call.client.routeDatabase.connected(newConnection.route())

// If we raced another call connecting to this host, coalesce the connections. This makes for 3
// different lookups in the connection pool!
if (connectionPool.callAcquirePooledConnection(address, call, routes, true)) {
val result = call.connection!!
nextRouteToTry = route
newConnection.socket().closeQuietly()
eventListener.connectionAcquired(call, result)
return result
}

synchronized(newConnection) {
connectionPool.put(newConnection)
call.acquireConnectionNoEvents(newConnection)
}

eventListener.connectionAcquired(call, newConnection)
return newConnection
}

代码有点长,但是其实还好,还是不难读的

  • 首先他判断这个 Call 是否被取消了,被取消了就在第一时间停止寻找这个 Connection

  • 然后再判断这个 Call 是否有了 Connection ,目的是为了尝试重复使用这个连接

  • 如果没有 Connection 就使用 connectionPool.callAcquirePooledConnection(address, call, null, false) 在连接池里找一个连接,我们进去看看这方法

callAcquirePooledConnection()
1
2
3
4
5
6
7
8
9
10
11
12
13
14
15
16
17
18
// RealConnectionPool.kt

fun callAcquirePooledConnection(
address: Address,
call: RealCall,
routes: List<Route>?,
requireMultiplexed: Boolean
): Boolean {
for (connection in connections) {
synchronized(connection) {
if (requireMultiplexed && !connection.isMultiplexed) return@synchronized
if (!connection.isEligible(address, routes)) return@synchronized
call.acquireConnectionNoEvents(connection)
return true
}
}
return false
}

这个方法很简单,就是在循环中遍历找一个符合条件的连接,我们再看看这里面的 call.acquireConnectionNoEvents(connection)

1
2
3
4
5
6
7
8
9
// RealCall.kt

fun acquireConnectionNoEvents(connection: RealConnection) {
connection.assertThreadHoldsLock()

check(this.connection == null)
this.connection = connection
connection.calls.add(CallReference(this, callStackTrace))
}

这里就是做一些检查然后赋值、添加引用

connection.isEligible

那么该如何进行判断这个连接是不是可用呢?我们看看这个 connection.isEligible

1
2
3
4
5
6
7
8
9
10
11
12
13
14
15
16
17
18
19
20
21
22
23
24
25
26
27
28
29
30
31
32
33
34
35
36
37
38
internal fun isEligible(address: Address, routes: List<Route>?): Boolean {
assertThreadHoldsLock()

// If this connection is not accepting new exchanges, we're done.
if (calls.size >= allocationLimit || noNewExchanges) return false

// If the non-host fields of the address don't overlap, we're done.
if (!this.route.address.equalsNonHost(address)) return false

// If the host exactly matches, we're done: this connection can carry the address.
if (address.url.host == this.route().address.url.host) {
return true // This connection is a perfect match.
}

// At this point we don't have a hostname match. But we still be able to carry the request if
// our connection coalescing requirements are met. See also:
// https://hpbn.co/optimizing-application-delivery/#eliminate-domain-sharding
// https://daniel.haxx.se/blog/2016/08/18/http2-connection-coalescing/

// 1. This connection must be HTTP/2.
if (http2Connection == null) return false

// 2. The routes must share an IP address.
if (routes == null || !routeMatchesAny(routes)) return false

// 3. This connection's server certificate's must cover the new host.
if (address.hostnameVerifier !== OkHostnameVerifier) return false
if (!supportsUrl(address.url)) return false

// 4. Certificate pinning must match the host.
try {
address.certificatePinner!!.check(address.url.host, handshake()!!.peerCertificates)
} catch (_: SSLPeerUnverifiedException) {
return false
}

return true // The caller's address can be carried by this connection.
}

这个函数并不复杂,我们一点点看:

  • 这个函数接受两个参数 addressroutes

    • address 有两个最关键的成员变量 uriHosturiPort

      1
      2
      3
      4
      5
      6
      7
      8
      9
      10
      11
      12
      13
      14
      15
      16
      class Address(
      uriHost: String,
      uriPort: Int,

      @get:JvmName("dns") val dns: Dns,
      @get:JvmName("socketFactory") val socketFactory: SocketFactory,
      @get:JvmName("sslSocketFactory") val sslSocketFactory: SSLSocketFactory?,
      @get:JvmName("hostnameVerifier") val hostnameVerifier: HostnameVerifier?,
      @get:JvmName("certificatePinner") val certificatePinner: CertificatePinner?,
      @get:JvmName("proxyAuthenticator") val proxyAuthenticator: Authenticator,
      @get:JvmName("proxy") val proxy: Proxy?,

      protocols: List<Protocol>,
      connectionSpecs: List<ConnectionSpec>,
      @get:JvmName("proxySelector") val proxySelector: ProxySelector
      )

      其余的成员都是从 OkHttpClient 抽出来的,而 hostport 是最关键的两个

      Address 是什么时候传进来的?是从 RetryAndFollowUpInterceptor 创建 ExchangeFinder 的时候创建的

    • routesList<Route>

      那么 Route 是什么呢?它包含三个部分 addressproxy socketAddress

      1
      2
      3
      4
      5
      6
      7
      8
      9
      10
      11
      class Route(
      @get:JvmName("address") val address: Address,
      /**
      * Returns the [Proxy] of this route.
      *
      * **Warning:** This may disagree with [Address.proxy] when it is null. When
      * the address's proxy is null, the proxy selector is used.
      */
      @get:JvmName("proxy") val proxy: Proxy,
      @get:JvmName("socketAddress") val socketAddress: InetSocketAddress
      )
  • 首先就是判断这个 call 能承受的最大连接数(HTTP2 之前都是一个)以及是否能接受新的请求(noNewExchangetrue 说明不再接受新的请求),只要有一个返回 false,就证明这个连接不可用

  • 然后我们继续看,下面两个 if 就是看这个连接和我的请求是不是同一个非主机地址,包括更多,比如:端口,tls 版本,代理配置等等…我们点进去看看

    1
    2
    3
    4
    5
    6
    7
    8
    9
    10
    11
    12
    internal fun equalsNonHost(that: Address): Boolean {
    return this.dns == that.dns &&
    this.proxyAuthenticator == that.proxyAuthenticator &&
    this.protocols == that.protocols &&
    this.connectionSpecs == that.connectionSpecs &&
    this.proxySelector == that.proxySelector &&
    this.proxy == that.proxy &&
    this.sslSocketFactory == that.sslSocketFactory &&
    this.hostnameVerifier == that.hostnameVerifier &&
    this.certificatePinner == that.certificatePinner &&
    this.url.port == that.url.port
    }

    可以看到他没有对比 host

    而下面这个 if 就直接对比了 host 是否一致,如果一致那就直接返回 true

    整合起来就是,如果其他的配置有一个不一致就返回 false ,如果上面的匹配一致,就再去判断 host 是否一致,host 也一致就直接返回 true

  • 如果 host 不匹配,就再进行最后的判断 connection coalescing

    Connection coalescing(连接合并)是 HTTP/2 协议中的一个关键特性,它允许多个不同主机名(host)的请求复用同一个底层 TCP 连接,只要它们满足某些安全和配置上的条件。

    下面的就是几步,判断是否满足连接合并:

    • 是 HTTP/2
    • IP 地址一致
    • hostnameVerifierOkHostnameVerifier
    • url 满足要求,包括端口一样,host 一样,证书匹配
    • 证书固定必须与主机匹配

    判断到最后就可以认定这个连接是可用的了

    但是这个 routes 是传入的,并且是 null !!!

    所以本次就无法返回 HTTP/2 的 connection

另一个 callAcquirePooledConnection()

再往下找,你会看到还有一个 connectionPool.callAcquirePooledConnection(address, call, routes, false)

这个和上面的请求参数不一样,上面的参数是 address, call, null, false 这个是 address, call, routes, false ,此次 routes 参数 不为 null

也就是说,当上面的非 HTTP/2 的 connection 拿不到,我们再在这里用路由信息,拿 HTTP/1 或者 HTTP/2 的 connection

最后一个 callAcquirePooledConnection()

此次的参数,又变了,它将 requireMultiplexed 设为 true

但是此次建立了 connection ,直接拿来用并把它放进连接池不就行了,这是为了避免,连接建立完成之后,防止其他请求抢先复用了连接池的新连接

但是!!!

我感觉 4.12.0 这个版本的 OkHttp 或许有点问题,因为这个最终的判断并没有加锁,只在将 newConnection 放进 connectionPool 的时候会加锁,那么怎么确定这个这两段代码之间,不会因多线程导致连接多次创建但是没有被获取到呢?

在之前的某个版本,是直接将 connectionPool 加锁进行判断并添加的,我感觉那个才是更稳妥的,如图:

another-okhttp.png

newConnection.connect

我们最后看一下这个新的连接是如何建立的

1
2
3
4
5
6
7
8
9
10
11
12
13
14
15
16
17
18
19
20
21
22
23
24
25
26
27
28
29
30
31
32
33
34
35
36
37
38
39
40
41
42
43
44
45
46
47
48
49
50
51
52
53
54
55
56
57
58
59
60
61
62
63
64
65
66
67
68
69
70
71
72
73
74
75
76
77
78
79
fun connect(
connectTimeout: Int,
readTimeout: Int,
writeTimeout: Int,
pingIntervalMillis: Int,
connectionRetryEnabled: Boolean,
call: Call,
eventListener: EventListener
) {
check(protocol == null) { "already connected" }

var routeException: RouteException? = null
val connectionSpecs = route.address.connectionSpecs
val connectionSpecSelector = ConnectionSpecSelector(connectionSpecs)

if (route.address.sslSocketFactory == null) {
if (ConnectionSpec.CLEARTEXT !in connectionSpecs) {
throw RouteException(UnknownServiceException(
"CLEARTEXT communication not enabled for client"))
}
val host = route.address.url.host
if (!Platform.get().isCleartextTrafficPermitted(host)) {
throw RouteException(UnknownServiceException(
"CLEARTEXT communication to $host not permitted by network security policy"))
}
} else {
if (Protocol.H2_PRIOR_KNOWLEDGE in route.address.protocols) {
throw RouteException(UnknownServiceException(
"H2_PRIOR_KNOWLEDGE cannot be used with HTTPS"))
}
}

while (true) {
try {
if (route.requiresTunnel()) {
connectTunnel(connectTimeout, readTimeout, writeTimeout, call, eventListener)
if (rawSocket == null) {
// We were unable to connect the tunnel but properly closed down our resources.
break
}
} else {
connectSocket(connectTimeout, readTimeout, call, eventListener)
}
establishProtocol(connectionSpecSelector, pingIntervalMillis, call, eventListener)
eventListener.connectEnd(call, route.socketAddress, route.proxy, protocol)
break
} catch (e: IOException) {
socket?.closeQuietly()
rawSocket?.closeQuietly()
socket = null
rawSocket = null
source = null
sink = null
handshake = null
protocol = null
http2Connection = null
allocationLimit = 1

eventListener.connectFailed(call, route.socketAddress, route.proxy, null, e)

if (routeException == null) {
routeException = RouteException(e)
} else {
routeException.addConnectException(e)
}

if (!connectionRetryEnabled || !connectionSpecSelector.connectionFailed(e)) {
throw routeException
}
}
}

if (route.requiresTunnel() && rawSocket == null) {
throw RouteException(ProtocolException(
"Too many tunnel connections attempted: $MAX_TUNNEL_ATTEMPTS"))
}

idleAtNs = System.nanoTime()
}

这里面有个 while(true) 循环,里面涉及一个 Tunnel 的概念,这个感觉有点超纲了,而且我也不是很懂,就不做解释了

大部分情况下,就直接 connectSocket 就行

1
2
3
4
5
6
7
8
9
10
11
12
13
14
15
16
17
18
19
20
21
22
23
24
25
26
27
28
29
30
31
32
33
34
35
36
37
38
39
@Throws(IOException::class)
private fun connectSocket(
connectTimeout: Int,
readTimeout: Int,
call: Call,
eventListener: EventListener
) {
val proxy = route.proxy
val address = route.address

val rawSocket = when (proxy.type()) {
Proxy.Type.DIRECT, Proxy.Type.HTTP -> address.socketFactory.createSocket()!!
else -> Socket(proxy)
}
this.rawSocket = rawSocket

eventListener.connectStart(call, route.socketAddress, proxy)
rawSocket.soTimeout = readTimeout
try {
Platform.get().connectSocket(rawSocket, route.socketAddress, connectTimeout)
} catch (e: ConnectException) {
throw ConnectException("Failed to connect to ${route.socketAddress}").apply {
initCause(e)
}
}

// The following try/catch block is a pseudo hacky way to get around a crash on Android 7.0
// More details:
// https://github.com/square/okhttp/issues/3245
// https://android-review.googlesource.com/#/c/271775/
try {
source = rawSocket.source().buffer()
sink = rawSocket.sink().buffer()
} catch (npe: NullPointerException) {
if (npe.message == NPE_THROW_WITH_NULL) {
throw IOException(npe)
}
}
}

这里面有个 rawSocket 就是 Connection 里面实际的 TCP 端口

connectSocket 之后,就需要建立 Http 连接了,establishProtocol 建立协议

1
2
3
4
5
6
7
8
9
10
11
12
13
14
15
16
17
18
19
20
21
22
23
24
25
26
27
28
@Throws(IOException::class)
private fun establishProtocol(
connectionSpecSelector: ConnectionSpecSelector,
pingIntervalMillis: Int,
call: Call,
eventListener: EventListener
) {
if (route.address.sslSocketFactory == null) {
if (Protocol.H2_PRIOR_KNOWLEDGE in route.address.protocols) {
socket = rawSocket
protocol = Protocol.H2_PRIOR_KNOWLEDGE
startHttp2(pingIntervalMillis)
return
}

socket = rawSocket
protocol = Protocol.HTTP_1_1
return
}

eventListener.secureConnectStart(call)
connectTls(connectionSpecSelector)
eventListener.secureConnectEnd(call, handshake)

if (protocol === Protocol.HTTP_2) {
startHttp2(pingIntervalMillis)
}
}

这里可以简单看一下,就是 Http 的标准操作

总结
  1. 有没有可用 connectionval callConnection = call.connection
  2. 通过地址获取一次连接 connectionPool.callAcquirePooledConnection(address, call, null, false)
  3. 通过路由再获取一次 connectionPool.callAcquirePooledConnection(address, call, routes, false)
  4. 自己创建连接
  5. 最后在只获取多路复用的连接 connectionPool.callAcquirePooledConnection(address, call, routes, true)

作为 Android 程序员,可能对于路由比较陌生的,下面知识尝试解决一下这个问题:

OkHttp 中,Route 是网络请求的底层通信路径信息,它代表一次连接的完整“路径”

RouteSelectorOkHttp 内部用于 选择可用连接路径(Route) 的核心组件,它根据你请求的目标地址、代理配置、DNS 解析结果等,生成一组可能的 Route,并按顺序尝试连接,直到成功或失败。

RouteSelector 用于 批量返回可尝试的 Routes 的临时封装

1
2
3
RouteSelection selection = routeSelector.next();
List<Route> allRoutes = selection.getAll();
Route nextRoute = selection.next(); // 依次尝试
  • 它内部维护一个 List<Route>
  • 每次调用 .next() 就返回下一个尚未尝试的 Route
1
2
3
4
5
6
7
8
9
10
11
12
13
14
15
16
17
18
19
              Address
|
+----------------+
| RouteSelector |
+----------------+
|
┌──────────────┴──────────────┐
| |
选择代理 DNS解析目标地址
| |
生成所有可用的 Route(IP + 端口 + 代理)
|
按顺序返回 RouteSelection
|
客户端依次尝试连接 Route
|
成功 → 使用连接
失败 → 记录失败 → 继续尝试

connection.isHealthy

获得 connection 之后,我们还需要判断它是否健康

1
2
3
4
5
6
7
8
9
10
11
12
13
14
15
16
17
18
19
20
21
22
23
24
25
26
27
// RealConnection.kt

fun isHealthy(doExtensiveChecks: Boolean): Boolean {
assertThreadDoesntHoldLock()

val nowNs = System.nanoTime()

val rawSocket = this.rawSocket!!
val socket = this.socket!!
val source = this.source!!
if (rawSocket.isClosed || socket.isClosed || socket.isInputShutdown ||
socket.isOutputShutdown) {
return false
}

val http2Connection = this.http2Connection
if (http2Connection != null) {
return http2Connection.isHealthy(nowNs)
}

val idleDurationNs = synchronized(this) { nowNs - idleAtNs }
if (idleDurationNs >= IDLE_CONNECTION_HEALTHY_NS && doExtensiveChecks) {
return socket.isHealthy(source)
}

return true
}

就是看看 socket 有没有关闭,还需要判断 http2Connection 健不健康,ping-pong 是否正常

获得一个既可用又健康的连接之后,就返回它

Exchange.find

回到这里,然后生成一个 Codec 这个 Codec 就是用来编写 Request 以及解析 Response 的工具

initExchange

这里获得 Codec 之后,然后生成一个 Exchange ,就可以用 codec 来生成 Request 然后发请求了

最后就直接返回到 ConnectInterceptor

CallServerInterceptor

1
2
3
4
5
6
7
8
9
10
11
12
13
14
15
16
17
18
19
20
21
22
23
24
25
26
27
28
29
30
31
32
33
34
35
36
37
38
39
40
41
42
43
44
45
46
47
48
49
50
51
52
53
54
55
56
57
58
59
60
61
62
63
64
65
66
67
68
69
70
71
72
73
74
75
76
77
78
79
80
81
82
83
84
85
86
87
88
89
90
91
92
93
94
95
96
97
98
99
100
101
102
103
104
105
106
107
108
109
110
111
112
113
114
115
116
117
118
119
120
121
@Throws(IOException::class)
override fun intercept(chain: Interceptor.Chain): Response {
val realChain = chain as RealInterceptorChain
val exchange = realChain.exchange!!
val request = realChain.request
val requestBody = request.body
val sentRequestMillis = System.currentTimeMillis()

var invokeStartEvent = true
var responseBuilder: Response.Builder? = null
var sendRequestException: IOException? = null
try {
exchange.writeRequestHeaders(request)

if (HttpMethod.permitsRequestBody(request.method) && requestBody != null) {
// If there's a "Expect: 100-continue" header on the request, wait for a "HTTP/1.1 100
// Continue" response before transmitting the request body. If we don't get that, return
// what we did get (such as a 4xx response) without ever transmitting the request body.
if ("100-continue".equals(request.header("Expect"), ignoreCase = true)) {
exchange.flushRequest()
responseBuilder = exchange.readResponseHeaders(expectContinue = true)
exchange.responseHeadersStart()
invokeStartEvent = false
}
if (responseBuilder == null) {
if (requestBody.isDuplex()) {
// Prepare a duplex body so that the application can send a request body later.
exchange.flushRequest()
val bufferedRequestBody = exchange.createRequestBody(request, true).buffer()
requestBody.writeTo(bufferedRequestBody)
} else {
// Write the request body if the "Expect: 100-continue" expectation was met.
val bufferedRequestBody = exchange.createRequestBody(request, false).buffer()
requestBody.writeTo(bufferedRequestBody)
bufferedRequestBody.close()
}
} else {
exchange.noRequestBody()
if (!exchange.connection.isMultiplexed) {
// If the "Expect: 100-continue" expectation wasn't met, prevent the HTTP/1 connection
// from being reused. Otherwise we're still obligated to transmit the request body to
// leave the connection in a consistent state.
exchange.noNewExchangesOnConnection()
}
}
} else {
exchange.noRequestBody()
}

if (requestBody == null || !requestBody.isDuplex()) {
exchange.finishRequest()
}
} catch (e: IOException) {
if (e is ConnectionShutdownException) {
throw e // No request was sent so there's no response to read.
}
if (!exchange.hasFailure) {
throw e // Don't attempt to read the response; we failed to send the request.
}
sendRequestException = e
}

try {
if (responseBuilder == null) {
responseBuilder = exchange.readResponseHeaders(expectContinue = false)!!
if (invokeStartEvent) {
exchange.responseHeadersStart()
invokeStartEvent = false
}
}
var response = responseBuilder
.request(request)
.handshake(exchange.connection.handshake())
.sentRequestAtMillis(sentRequestMillis)
.receivedResponseAtMillis(System.currentTimeMillis())
.build()
var code = response.code

if (shouldIgnoreAndWaitForRealResponse(code)) {
responseBuilder = exchange.readResponseHeaders(expectContinue = false)!!
if (invokeStartEvent) {
exchange.responseHeadersStart()
}
response = responseBuilder
.request(request)
.handshake(exchange.connection.handshake())
.sentRequestAtMillis(sentRequestMillis)
.receivedResponseAtMillis(System.currentTimeMillis())
.build()
code = response.code
}

exchange.responseHeadersEnd(response)

response = if (forWebSocket && code == 101) {
// Connection is upgrading, but we need to ensure interceptors see a non-null response body.
response.newBuilder()
.body(EMPTY_RESPONSE)
.build()
} else {
response.newBuilder()
.body(exchange.openResponseBody(response))
.build()
}
if ("close".equals(response.request.header("Connection"), ignoreCase = true) ||
"close".equals(response.header("Connection"), ignoreCase = true)) {
exchange.noNewExchangesOnConnection()
}
if ((code == 204 || code == 205) && response.body?.contentLength() ?: -1L > 0L) {
throw ProtocolException(
"HTTP $code had non-zero Content-Length: ${response.body?.contentLength()}")
}
return response
} catch (e: IOException) {
if (sendRequestException != null) {
sendRequestException.addSuppressed(e)
throw sendRequestException
}
throw e
}
}

这个 Interceptor 的工作就是在构建 Request 然后接收到数据并组装 Response

然后就到了最后,

  • 也就是返回 Response 之后,就会返回给上个 Interceptor 也就是 ConnectionInterceptor
  • ConnectionInterceptor 没有后置工作,继续向上返回,返回到 CacheInterceptor
  • CacheInterceptor 拿到 Response 之后看看需不需要往缓存里放,如果需要就放进缓存,然后返回到 BridgeInterceptor
  • BridgeInterceptor 会读 Response 的各种 Header ,还有解压缩,再返回到 RetryAndFollowUpInterceptor
  • RetryAndFollowUpInterceptor 就是重试和重连

OVER

以上就是 OkHttp 的源码阅读过程,确实有点费劲,但是还是值得的

  • Title: 阅读 OKHttp 源码
  • Author: lucas
  • Created at : 2025-04-26 23:00:57
  • Updated at : 2025-05-13 23:43:35
  • Link: https://darkflamemasterdev.github.io/2025/04/26/阅读-OKHttp-源码/
  • License: This work is licensed under CC BY-NC-SA 4.0.
Comments